Clustered JavaServer Pages (JSPs)
iPlanetTM
Application Server Samples
Updated June 12, 2001
If you have already configured the JSP-based clustering sample, then you can
run the application by clicking here.
Clustering can provide failure and high availability. This example application
demonstrates how a request to a JSP may be shared or load balanced between all
machines in a cluster, with the HttpSession or "shopping cart" information surviving
an abnormal condition in any server in the cluster.
Setting Up the Environment
Getting Started includes a
checklist of prerequisites for deploying sample applications to iPlanet.
Prior to running this sample, read the overall instructions
for setting up a simple cluster using iPlanet Application Server.
Deploying and Running the Application
Command Line-based Deployment describes how to
manually register the application in iPlanet using a Command Line Interface
(CLI). This is the fastest means of deploying the application.
GUI-based Deployment describes how to use the
iPlanet Deployment Tool to import and deploy the sample application. It
also addresses assembling the application from scratch using the Deployment
Tool.
Running the Application describes how to start the application,
navigate through it and how to troubleshoot in the event of problems.
Further Exploration
Exercising the Cluster describes how to
explore clustering capabilities and simulate failures.
Compiling and Assembling the Application describes
how to use command line tools to recompile the sources and rebuild the WAR
module and the overall EAR file.
Modifying Domain Setting via iPlanet Registry
describes how to change a key clustering value in the runtime environment.
Command Line-based Deployment
You have a choice of deploying and registering the application through either
command line utilities or the iPlanet Application Server Deployment Tool GUI.
Since a complete EAR file is supplied, the fastest means of setting up the application
is to use the command line utilities as described in this section. If you would
like to experience either deploying through a GUI tool or assembling an application
from scratch, then follow instructions in GUI-based Deployment.
The pre-built cluster-jsp.ear
file is a Enterprise ARchive file that contains the Web Archive
(WAR) file of the application. Within the WAR file resides the XML deployment
descriptor files, application class files, JSPs and other content required by
the application.
There are two steps to deploying the application:
- Modify Session Domain Setting
- Deploy Application
Modify Session Domain Setting
Since the cluster JSP application contains a domain setting that is unique
to your network environment, you cannot exercise a multi-machine cluster without
first modifying a domain name setting in the application.
The application server automatically inserts the domain parameter into cookies
when the application is accessed by a browser. With no domain set, the browser
will return the cookie to only the host of the web server that sent the cookie
to the browser. Since in this HA example we are using multiple web servers,
each with a different host name, we must ensure that the browser can send application
web requests and the embedded session tracking cookies to either web server
host associated with the cluster.
For example, server1.central.sun.com
and server2.sun.central.sun.com.
The domain string argument must contain at least 2 or 3 periods (3 period-domains
apply to domains like acme.co.uk). If the domain is set
to acme.com, then the session cookies can be returned from
the browser to any web server hosts in the acme.com
domain.
To modify the domain name, you have two choices:
- Modify the domain
setting in the ias-web.xml
deployment descriptor, rebuild the WAR and EAR files and register the application.
- Manually register the supplied EAR file and then modify domain
setting in the iPlanet Application Server Registry.
Modifying this setting in the ias-web.xml
file is preferred because the change will be present each time you deploy the
application to the application server. See the following instructions for modifying
the ias-web.xml file.
To modify the domain
setting in the ias-web.xml
file:
- Edit cluster/jsp/src/ias-web.xml
- Change the <domain>
field to match the overall domain of your network environment.
<session-info>
<impl>distributed</impl>
<dsync-type>dsync-distributed</dsync-type>
<timeout-type>last-access</timeout-type>
<secure>false</secure>
<domain>iplanet.com</domain>
<path>/</path>
<scope></scope>
</session-info>
- Rebuild the application by executing the build command:
build
On UNIX, prior to executing the build command, you need to ensure that install_dir/ias/bin
is in your PATH.
Executing the build command will compile the application source files and reassemble
both the WAR and EAR files. The EAR file will be placed in:
cluster/jsp/assemble/ear/
See the Compiling and Assembling the Application
section for more details on rebuilding the application.
Deploy the Application
Deploy to Local Instance First
Deploying either the pre-existing or newly assembled cluster-jsp.ear
file is simple.
1. Go to the assembly location under the sample directory:
install_dir/ias/ias-samples/cluster/jsp/assemble/ear/
2. Execute iasdeploy
to deploy application to the local application server instance:
iasdeploy
deployapp cluster-jsp.ear
Refer to the Getting Started
section for more information on using the iasdeploy
command.
The deployment process involves the following operations:
- iasdeploy authenticates against the local application server's administrative
server.
- the EAR file is transferred to the administrative server.
- the administrative server begins the registration process:
- parses the EAR file and embedded WAR file
- registers the J2EE application "cluster-jsp" in the iPlanet Registry
within the directory server
- registers the embedded WAR module in the iPlanet Registry within the
directory server
- extracts the WAR module to the JAR/
directory.
- expands the content of the WAR module to the APPS/cluster-jsp/
directory.
Deploy to Remaining Instances
Since you are setting up a cluster, you will need to deploy the application
to each application server in the cluster. The iasdeploy
command has the ability to perform remote deployments to application server
instances. Assuming that you've already registered the application server instances
in the application server administrative tool, you can simply execute the following
command to deploy the application to a remote instance:
iasdeploy deployapp -instance
iAS2 cluster-jsp.ear
Where iAS2 represents
the logical name assigned to the second instance in the cluster. Start the application
server administrative tool to determine the name of the second instance.
Refer to the Getting Started
section for more information on using the iasdeploy
command.
Now you're ready to exercise the sample by Running the Application.
GUI-Based Deployment
The Deployment Tool provides an easy-to-use means of assembling J2EE applications
and deploying applications to iPlanet Application Server. For most cases, use
of Deployment Tool is recommended over the approach of manually creating XML-based
deployment descriptors and manually assembling J2EE modules and application JAR
files.
Two approaches to using the Deployment Tool are described:
Import Pre-existing EAR File to quickly
deploy the application to iPlanet using the Deployment Tool. None of the application
assembly steps are covered by this section. On average, this approach will take
5-10 minutes.
or
Assemble the Application to learn how to use Deployment
Tool to assemble the application from scratch and to deploy it to the application
server. On average, this approach will take from 15-30 minutes.
Import Pre-existing EAR File
Since a pre-built Enterprise ARchive (EAR) file for the Cluster-JSP application
is included with the application server, you can use the Deployment Tool
to quickly read in the .ear file and deploy it to the application server.
Open the pre-existing Cluster-JSP EAR File
-
Launch the Deployment Tool on one of the two machines in the cluster.
UNIX:
Execute install_dir/ias/bin/deploytool
Windows:
Start->Programs->iPlanet Application Server 6.0->iAS Deployment
Tool
-
Open the cluster-jsp.ear
file
- In the startup dialog, select "Browse for more applications" to find the
cluster-jsp.ear file.
- Navigate to ias/ias-samples/cluster/jsp
and open the cluster-jsp.ear
file.
- Click on the file name to expand the EAR file.
- Click on Component View to see the components of the web application
and EJB JAR file.
Modify the Domain Setting to Suit Your Environment
- Select the HA JSP
WAR module, right click and select Edit Descriptor so that you can
modify the domain setting of the web application.
- Select the IAS tab.
- In the Domain text box, enter the domain name associated
with network in which the web server machines are located.
The application server automatically inserts the domain parameter into cookies
when the application is accessed by a browser. With no domain set, the browser
will return the cookie to only the host of the web server that sent the cookie
to the browser. Since in this HA example we are using multiple web servers,
each with a different host name, we must ensure that the browser can send
application web requests and the embedded session tracking cookies to either
web server host associated with the cluster.
For example, server1.central.sun.com
and server2.sun.central.sun.com.
The domain string argument must contain at least 2 or 3 periods (3 period-domains
apply to domains like acme.co.uk). If the domain is set
to acme.com, then the session cookies can be returned
from the browser to any web server hosts in the acme.com
domain.
- Click on the X of the upper right hand corner of the web application descriptor
to save and close the descriptor.
- Select the cluster-jsp
J2EE application. Select File->Save
to save the WAR level changes to the EAR file.
Proceed to Deploy the Application
Assemble the Application
This approach involves assembling the Cluster JSP application from scratch.
After compiling the Java sources, you will start Deployment Tool and create
the application WAR, EJB JAR and EAR files. Then you will deploy the application
to the application server.
-
Compile Application Sources
-
Create cluster-jsp.war
Module
-
Assemble cluster-jsp.ear
-
Deploy Application
Compile Application Sources
To compile the application sources, simply execute "build
compile" under the application's src/
directory. See the section Compiling and Assembling the Application
for more information on recompiling the application using the supplied build
facility.
Create WAR Module
Identify the Content for WAR File
1. Create cluster-jsp.war:
- In the startup dialog, select New Web Application (.war file)
- Alternatively, if Deployment Tool is already started, select File ->
New.
- Click on Web Application.
- Enter "cluster-jsp.war"
as the archive file name.
- Click on Browse to navigate to the directory install_dir\ias\ias-samples\cluster\jsp\assemble\
- Click on OK to exit the dialog window.
- The WAR module appears in the Web Applications pane of the Deployment Tool
window.
- Click on Component View to see only the name of the WAR module without
the directory path.
2. Now insert the javabean classes file in the cluster-jsp.war
file:
- Select the WAR module and right click. Select Insert Files (Alternatively,
select the module, select Edit->Insert Files...)
- Choose the path install_dir\ias\ias-samples\cluster\jsp\build\lib\classes
- Click on the double arrows (>>) to move the HostInfo.class
and the Infobean.class files into right side of the dialog window.
- Click on Resolve to determine if the class depends on classes that
are not part of the WAR module.
- Click on Insert to add the class to the WAR module.
3. Now insert the single JSP file in the cluster-jsp.war
file:
- Select the WAR module and right click. Select Insert Files (Alternatively,
select the module, select Edit->Insert Files...)
- Choose the path install_dir\ias\ias-samples\cluster\jsp\src\docroot
- Click on the double arrows (>>) to move the Ha.jsp
file into right side of the dialog window.
- Click on Resolve to ensure that the JSP file is positioned at the
root of the WAR module.
- Click on Insert to add the JSP to the WAR module.
- Click on File View to see the complete list of files added to the
module.
Modify Web Application Descriptor
Now we need to make several changes to settings at the WAR module level.
To do so, select either the WAR file path if in File View or the
WAR module name if in Component View. Right click and select Edit
Descriptor.
For each tab listed below, set the name fields to the associated values.
1. General Tab
| Name |
HaJsp |
| Distributable |
checked/enabled |
| Session Timeout (seconds): |
-1
(take server default of 500 seconds) |
2. iAS Tab
| Distributed Session |
checked/enabled |
| Timeout (seconds): |
-1 (take server
default of 500 seconds) |
| Timeout Type |
Since last access |
| Domain |
Domain name of the network in which your web servers are located. for
example "iplanet.com".
The domain parameter is used in the session cookie for this application.
With no domain set, the browser will return the cookie to only the host
of the web server that sent the cookie to the browser.
This setting is especially important when multiple web servers are in
front of one or more app servers. If multiple web servers are used, the
domain allows the browser to return the cookie to any web server in that
domain. For example, server1.central.sun.com and server2.sun.central.sun.com.
The domain string argument must contain at least 2 or 3 periods (3 period-domains
apply to domains like acme.co.uk). If the domain is set to acme.com, then
the session is visible to foo.acme.com, bar.acme.com, etc. |
| Data Synchronization |
Distributed |
Save and close cluster-jsp.war
-
Before closing the WAR file, you might find it useful to double check your
settings against the previous instructions.
-
Select the WAR module in the Web Applications window.
-
Select File->Close to save and close the estore.war file.
Now that we've assembled the J2EE WAR module, we're ready to move on to
assembling the module into an EAR file.
Assemble EAR File
1. Create cluster-jsp.ear:
- In the startup dialog, select New J2EE Application (.ear file)
- Alternatively, if Deployment Tool is already started, select File ->
New.
- Click on J2EE Application.
- Enter "cluster-jsp.ear"
as the archive file name.
- Click on Browse to navigate to the directory install_dir\ias\ias-samples\cluster\jsp\assemble\
- Click on OK to exit the dialog window.
- The EAR file appears in the J2EE Applications pane of the Deployment
Tool window.
- Click on Component View to see only the name of the EAR without
the directory path.
2. Add cluster-jsp.war
Files:
- Select the estore EAR entry.
- Right click, select Insert Files.
- Navigate to the install_dir\ias\ias-samples\cluster\jsp\assemble\
directory.
- Select WAR file.
- Click on the double arrows (>>) to move this file into right side of the
dialog window.
- Click on Resolve to modify the location of this file relative to
the root of the EAR file.
- Select the file.
- Set the Update Destination Path to blank since the J2EE module
should appear at the root of the EAR file. Click on Update to modify
the relative location. Click on OK to close the resolve dialog window.
- Click on Insert to close the insert dialog window and to add the
file to the EAR.
3. Set Context Root for Web Application
Next, we need to set the context root of the web application. This value will
appear in URLs that access web application components. For example, in the URL
http://localhost/NASApp/cluster-jsp/HaJsp
the "cluster-jsp"
value is the context root of the web application.
-
Select WAR module, right click and select Edit Descriptor
-
Set the Context Root to "cluster-jsp".
-
Close the descriptor by clicking on the X in the upper right hand corner
of the descriptor window. Click on Yes when asked to save the changes.
4. Save cluster-jsp.ear:
-
Select the EAR file in the J2EE Applications window.
-
Select File->Close to save and close the EAR file
Now that the EAR file has been assembled, the next step is to deploy the
application to an application server instance.
Deploy the Application
Now you're about to deploy the application by transferring the EAR file to several
target iPlanet Application Servers. First, you will identify the target servers
- two machines in our cluster example. After the EAR file is deployed to an application
server, post processing is performed. The post processing step involves running
iasdeploy
against the transferred cluster-jsp.ear file. You will see the output from iasdeploy
fed back to the deployment window. After this step, you will be able to run the
application. No server restart is required.
Since we are exercising a two machine, two application server instance cluster,
we need to deploy the application to each instance in the cluster. Deployment
Tool support one button deployment to multiple server instances.
Although you could perform the deployment steps manually by transferring
the EAR file to the remote application servers and executing iasdeploy
to register the EAR file, Deployment Tool provides a point and click means
of deploying applications to remote iPlanet Application Servers.
If you followed the assembly instructions, then cluster-jsp.ear
is opened in Deployment Tool. If you opened the pre-existing EAR file, you are
working with install_dir\ias\ias-samples\cluster\jsp\cluster-jsp.ear.
If you are following the "Create EAR File from Scratch" instructions, you are
modifying install_dir\ias\ias-sample\cluster\jsp\cluster-jsp.ear.
If you entered all deployment information manually, you can skip the
following steps 1 to 3, because you have entered this information already.
1. Select the cluster-jsp.ear
file under the J2EE Application window.
2. Select File -> Deploy
3. If you have not already registered the target application servers,
do so now by clicking on the Register button. Enter the host name, administrative
port number and username/password for each target application server.
Note: You may authorize additional users to deploy applications to
an application server by using the application server's Administrative Console.
See the Security settings tab in the application server's Administrative Console.
4. Select both of the registered servers. Click on Overwrite modules in
case you are repeating the deployment step.
5. Click on Deploy to start the deployment process to both servers.
Since Deployment Tool recognizes that the selected application server instances
share a common Registry, the deployments are serialized. After deploying to
the first server instance, Deployment Tool will begin the deployment to the
second instance.
6. Now the file transfer and application registration begins. See the Deploy
tab for the status of the deployment. The deployment may take a minute or so
to complete. Once the status of each deployment changes to Success, go
back to step 4. and repeat the process for the second server.
Verifying Registration
As an optional step, you can use the iPlanet Application Server Administration
Tool to verify that the application has been registered. If you do not
want to verify that the application has been registered, proceed directly
to Running the Application.
- Start the application server's Administration Tool
UNIX:
install_dir/ias/bin/ksvradmin
Windows:
Start->Programs->iPlanet
Application Server->iAS Administration Tool
- Select the server name (default name of iAS1)
and select the Application button in the top right hand corner of the window
to see the applications registered in this instance of the application server.
-
You should see several folders for the "cluster-jsp" J2EE application.
The "cluster-jsp" folder with the world icon represents the web application
module.
- Click on the world icon and the list of servlet/JSP for that module will
appear on the right.
-
Highlight the cluster-jsp_HaJSP
entry and click Servlet Component Properties below.
- A dialog box with a list of server IP addresses that the servlet/JSP is
registered on will appear.
-
Verify that the IP addresses listed are the IP addresses of the servers
in the cluster. The port numbers represent the KXS engines which represent
each application server instance.
To see more details associated with the cluster-serlvet application, you
can browse the iPlanet Application Server Registry using a tool named kregedit:
- Execute kregedit
to start the application server's Registry Editor GUI.
-
Navigate to the SOFTWARE/iPlanet/Application
Server/6.0/ portion of the tree.
-
Browse the J2EE-Application/
tree and look for the "cluster-jsp" application.
-
Expand the "cluster-jsp" folder and explore this portion of the directory
tree.
-
Now open the J2EE-Module/
tree and look for the "cluster-jsp" web application module entry.
-
Expand each of these folders and explore their contents.
- Once you find the GUID associated with servlet/JSP in the cluster-jsp application,
you can navigate through the SOFTWARE/iPlanet/Application
Server/ClassDef/ folders to find out more details on the JSP/servlet.
Expanding the matching GUID folder under the ClassDef
folder will show you the detailed settings associated with the servlet/JSP.
Running the Application
Steps Before Running the Application
Set Round Robin Load Balancing
1. In the application server's Admin Tool, select one of the two application
server instances and under the Load Balancing section, select Round
Robin (Web Connector Driven) as the load balancing option. Click on Apply
to save the change to the Registry.
2. Select View->Refresh List. This action will reload Registry settings
into the Admin Tool.
3. Select the other app server instance and select the Load Balancing
button to verify that the Round Robin setting matches the setting for
the first server.
4. Restart the web server instances to ensure that the web server plugins reload
the modified Registry settings.
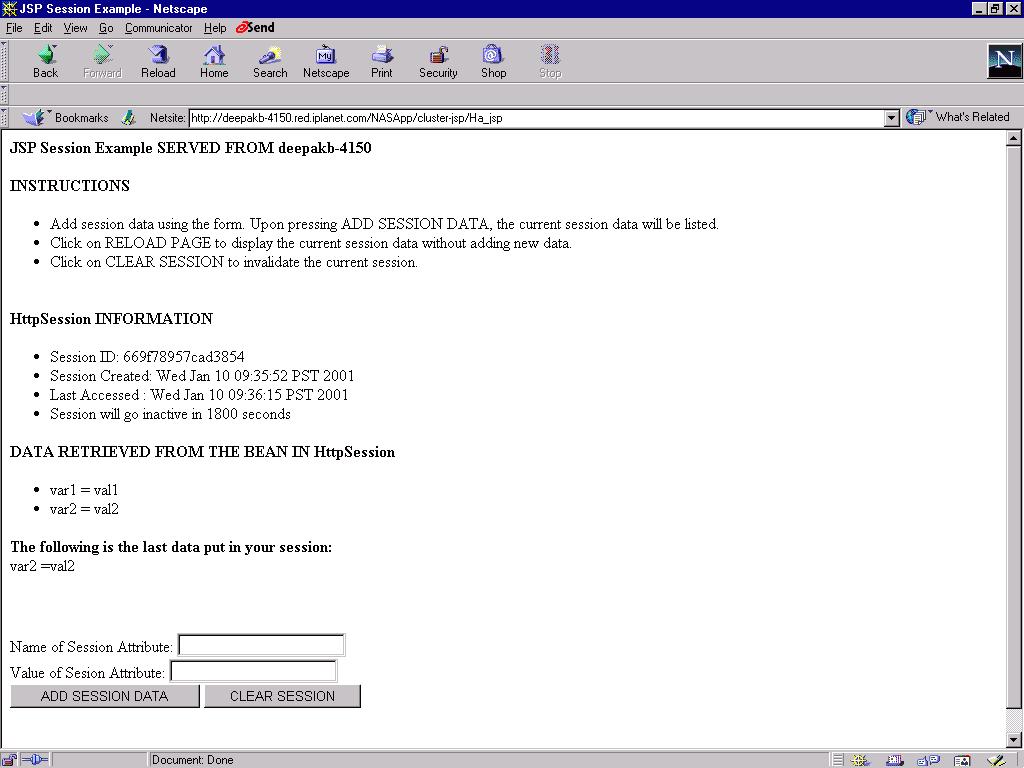
Run the Application
-
Select one of the two web server hosts as a target web server and open
your browser and go to the following URL:
- http://yourwebserver:portnumber/NASApp/cluster-jsp/HaJsp
-
Note the host name in the title of the web page. This host name denotes
the application server containing the JSP that processed the request.
Since the application is not initially configured as "sticky", the host
name will vary as you resubmit the page. If you have caching activated
in your browser, you might need to press SHIFT when clicking on RELOAD
to ensure web requests are sent to the web server.
-
Note that although the host name on which the JSP executes varies, the
Session ID is the same across web requests.
-
Insert session data by adding information to the Name and Value
data entry areas and selecting ADD SESSION DATA insert the information
into the application's HttpSession object. As the form is redisplayed,
the current set of session data is listed. The host name will continue
to change.
-
Add more session data.
-
Select the RELOAD PAGE link at the bottom of the page to redisplay
the session data.
-
Select CLEAR SESSION to force the JSP to invalidate the current
session.
Monitor kjs and kxs Log Output
While running the application, monitor the kjs log output to see messages written
by the JSP. In later steps, when simulating outage conditions, you will see cluster
status messages displayed in these logs as well. Refer to the Getting
Started section for information on monitoring log output.
Exercising the Server Clustering Capabilities
This example application demonstrates a JSP that will be served by either
machine in a cluster, with the HttpSession or "shopping cart" information
surviving an abnormal condition in either server in the cluster.
While exercising the sample in a clustered environment, it will be useful
for you to monitor the application server log files.
Load Balancing
This application makes it simple to demonstrate load balancing. The JSP
in this application displays the server name it was executed on each time.
By making subsequent requests to the URL at the bottom of the page, note
the host name displayed on the html page. The load balancing algorithm
is determined by the method selected in the iPlanet Application Server
Admin Console.
Sticky Versus Non-sticky
By default, the JSP cluster sample is configured as "non-sticky". This means
that each web request to the JSP will be load balanced by the web connector to
one of the application server instances. Since the application is configured
with "distributed" session, the servlet session data is maintained across the
cluster and can be retrieved by the JSP regardless of the instance on which it
is running.
In production environments, customers typically configure applications
as "sticky". In these cases, only the first web request to an application
will be load balanced by the web connector. Subsequent requests for
the same user session will be routed to the JVM (kjs) that processed the
initial request for the session - unless the JVM is not available.
This configuration enhances performance by not relying on cross machine
access to session data. Under normal operating conditions, the JVM
in which the session data was originally created accesses the session data
throughout the user's session.
The web connector detects unavailable JVMs and will redirect the web
requests to application server instances that are still available.
As long as the application is configured as "clustered" , the surviving
JVMs are capable of retrieving the application session data.
Experimenting with Load Balancing, Sticky and Distributed Settings
You can modify these settings through the iPlanet Application Server Admin
Console. Since the application is configured by default with "distributed"
session support, but is set to "non-sticky", it is most useful to run a
series of tests before and after setting the application to "sticky".
Session Tracking and Timeout
Cookies versus URL Rewriting
By enabling and disabling cookies in your browser, you will see that the
application server is able to maintain session continuity via either cookies
or URL rewriting. If you activate "Warn me before accepting cookies" in
your browser, you'll see the session tracking cookies generated by the
application server.
Session Timeout
By default, the application session timeout for HaJsp is set to "-1", assume the
default server timeout (500 seconds). You can modify this value by using Deployment
Tool to modify the Web Application Descriptor of the application. After redeploying
the application with the modified timeout setting, you will need to restart the
application server instances. As an alternative, you can change the session timeout
in the web.xml and
ias-web.xml files and use the Ant-based build facility to rebuild
the WAR and EAR files.
Scalability
Enable Multiple kjs Engines Per Application Server Instance
One can easily add a varying number of JVMs (kjs processes) to each application
server instance via the application server's Admin Console. Adding kjs processes
does NOT require an application server restart. Nor does the addition and deletion
of kjs processes require web server restarts.
High Availability
Simulated outages will demonstrate both failover and high availability.
The web connector plugin will distribute requests to all machines in the
cluster. When a machine goes off line for any reason, the webserver connector
detects this condition and a) ceases to send requests to that machine until
it has rejoined the cluster and b) forwards requests to other available
machines.
1. Stop one of the iPlanet Application Server instances on one of the machines
in the cluster. You can stop an instance via either the application server's
Admin Console or using the following approaches:
Windows
- Open the Windows Control Panel and double-click Services.
- Select the iPlanet Application server and select Stop.
UNIX
- As the app server user, cd to install_dir/ias/bin.
- Execute the command ./iascontrol stop
2. Continue to make requests and note that all requests are still served by the
remaining application server.
3. Demonstrate that the downed server will rejoin the cluster by restarting
the downed server.
Windows
- Open the Windows Control Panel and double-click Services.
- Select the iPlanet Application server and select Start.
UNIX
- As the app server user, cd to install_dir/ias/bin.
- Execute the command ./iascontrol
start
4. Continue to make requests from the web browser and note that the web
connector begins to redistribute requests to the app server after a minimal time
delay. The default delay for the web server plugin to retry an inactive application
server instance is 30 seconds. In practice, you should see the plugin recognize
the reactivated server within one to two minutes. The Registry setting for this
retry delay is SOFTWARE/iPlanet/Application
Server/6.0/CCS0/LOADB/ConnRetry. You can use kregedit
to experiment with different values in this key.
5. Demonstrate that the session information will survive JVM (kjs engine)
crashes by stopping one or all of the kjs engines across both servers.
Since the kxs engines manage replication of session information and hold
the session data in their memory space, the session data will survive and
will remain accessible as long as at least a single JVM/kjs is still alive
within at least one of the app server instances. If all of the JVMs across
all of the server instances are killed, then session data will be preserved
and will become accessible as soon as the JVMs are automatically restarted
by the application server watchdog processes.
6. Demonstrate network outages by pulling the network cable from one
of the servers between web requests.
Compiling and Assembling the Application
To easily recompile, assemble and deploy the application, see the Sample
Application Build Facility document for details on using a build facility
to quickly perform these tasks.
For example, to rebuild the entire application from scratch, follow these steps:
1. Compile and Assemble Web Application
Execute "build"
under cluster/jsp/src/
The default target core
will be executed to rebuild the WAR and EAR files.
2. Redeploy Application
Execute "build deploy"
under cluster/jsp/src/
3. Restart Application Server
An application server restart will be necessary if you've modified deployment
descriptors. For servlet and/or JSP modification, no restart is is necessary.
To clean the web application project area, execute "build
clean".
Modifying Domain via Registry Editor
After registering the application, you can modify the domain
setting in the iPlanet Registry of the runtime environment. Note that whenever
you modify the runtime settings of an application in the Registry, then next time
you deploy the application, the changes will be overwritten. Therefore, it is
preferred that you modify application settings in the application's deployment
descriptors, reassemble and redploy the application.
- Start the iPlanet Registry Editor using the kregedit
command.
- Navigate to the SOFTWARE\iPlanet\Application
Server\6.0\J2EE-Module\cluster-jsp\ folder.
- Double click on session-domain
and modify the domain name based on your network environment.
- Restart the application server to pick up the change.
Copyright
(c) 2000 Sun Microsystems, Inc. Some preexisting portions; Copyright (c)
2000 Netscape Communications Corp. All rights reserved.