Clustering - Windows Configuration
iPlanetTM
Application Server Samples
Updated June 12, 2001
Prior to installing iPlanet Application Server, please review "Preparing
for Installation" and "System Requirements" in the iPlanet Application
Server Installation Guide. Also review the Sample Cluster
Configuration Overview of the cluster samples to ensure that you understand
the layout of the cluster used in the examples.
This document explains how to install iPlanet Application Server on Windows
in a simple cluster configuration.
- Installation of Machine 1
- Installation of Machine 2
- Verification of the Cluster Configuration
Note: The following screen images were taken from a iPlanet Application
Server 6.0 product installation. Service Pack versions of the iPlanet Application
Server 6.0 contain screens that are slightly different than those shown below.
Installation of Machine 1
The following procedure describes how to install iPlanet Application Server using
the Custom installation option:
- Insert the iPlanet Application Server Install CD-ROM into the CD-ROM drive.
- Click Start on the Windows task bar and click Run, or choose File
- Run from the Windows Program Manager and click the Run button.
- Click Browse and go to the CD-ROM drive (for example, d:\).
- Open the NT folder and run the file setup.exe.
- Follow the instructions of the installation program.
- When prompted to select Server or Console installation, click
iPlanet Servers as shown in the following figure:

- This gives you the choice to install iPlanet Application Server, iPlanet
Directory Server, Netscape Console, iPlanet Application Server Administration
tool, and the Web connector plug-in. (Selecting Netscape Console installs
Console as a stand-alone application.)
- When prompted for the installation
type, click Custom.

- Select the installation directory
as shown in the following figure:

- The default directory is c:\iPlanet\iPlanet Application Server6. Note
that if you use the default, iPlanet Application Server is installed in
c:\iPlanet\iPlanet Application Server6. You cannot use a directory name that includes spaces.
- Click Next.
- To install iPlanet Application Server along with Directory
Server, be sure the default selections are checked as shown in the following
figure:

- iPlanet Server Family Core Components
- iPlanet Directory Suite
- Administration Services
- iPlanet Application Server 6.0
- Although iPlanet Directory Server 4.0 Synch Service
is listed on the screen, do not select this component.
- Click Next.
- Choose "This instance will be
the configuration directory server" as shown in the following figure if you
are installing Directory Server with this instance of iPlanet Application Server. This is recommended
for this clustering exercise.

- Otherwise, choose "Use existing configuration
directory server" and enter the settings to be used by the Directory Server:
- Host name of the machine in Server Identifier
- Server Port number
- Bind As
- Password
- Choose "Store data in this directory
server" as shown in the following figure if you are installing Directory Server
with this instance of iPlanet Application Server. This is recommended for this clustering exercise.

- Otherwise, choose "Store data to existing Directory
Server" and enter the following:
- Host
- Port
- Bind As
- Password
- Suffix

- Enter the following Directory
Server settings:
- Server Identification
- Port number
- Suffix
- Enter the Administrator ID and
password to the configuration directory as shown in the following figure:

- Important: This is the Administrator ID and password
required to uninstall iPlanet Application Server and Directory Server.
- Make a note of this information, as you will
need it if you uninstall either of these products.
- Enter the name of the Administration
Domain where iPlanet software information is stored on Directory Server as
shown in the following figure:
Note: Your domain should
appear here

- Enter the Directory Manager distinguished
name (DN) and password as shown in the following figure:

- The default value for the distinguished name
is cn=Directory Manager.
- Choose the supplier and consumer
replication settings as shown in the following figure:
For this exercise, choose the defaults
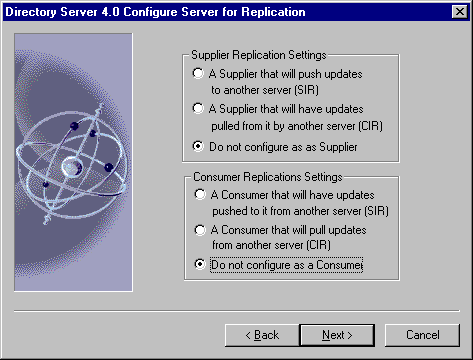
- For more information about consumer and supplier
replication, see iPlanet Directory Server documentation:
- http://docs.iplanet.com/docs/manuals/directory.html#dirserver
- Specify if you want to populate
the directory server with commonly used entries to help you get started by
checking the checkbox as shown in the following figure. Then decide if you
want to populate the database by selecting the appropriate radio button as
shown:
For this exercise, choose the defaults
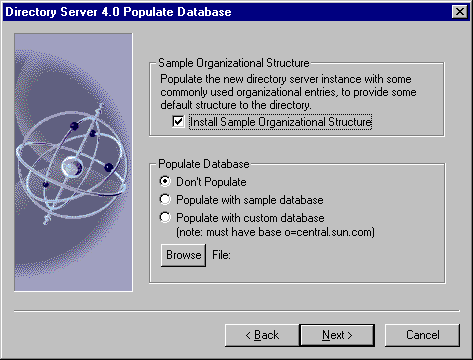
- For more information about populating the iPlanet
Directory Server database, see Directory Server documentation:
- http://docs.iplanet.com/docs/manuals/directory.html#dirserver
- Decide whether or not to enable
schema checking for your directory server by selecting or deselecting the
checkbox as shown in the following figure:
For this exercise, choose the defaults
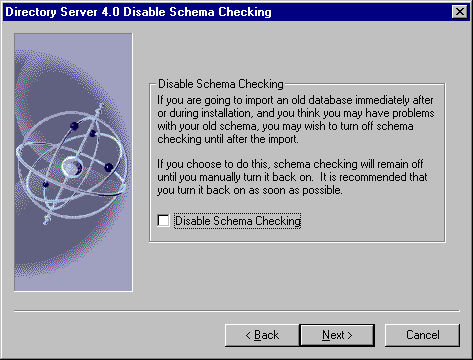
- For more information about installing and configuring
Directory Server, see the Directory Server documentation:
- http://docs.iplanet.com/docs/manuals/directory.html#dirserver
- (Optional) Enter a specific IP
address to bind to your Administration Server.
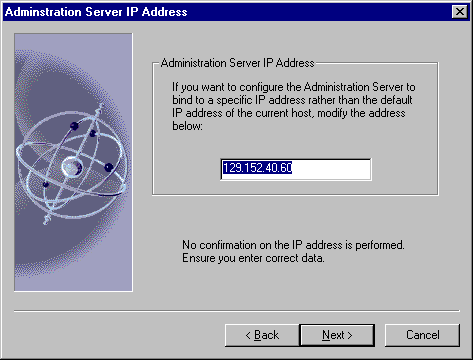
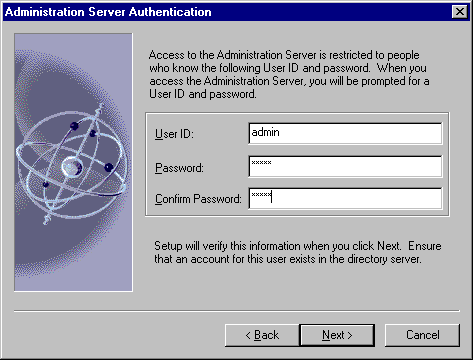
- When prompted for the Administration
Server user ID and password, enter the user ID and password that will be required
to log on to the Administration Server through the administration tool (iPlanet Application Server
Administration tool).
- Make sure this user ID and password account
has been created in Directory Server.
- Enter the port number for the
Directory Server Administration Server as shown in the following figure:
Note your server name will appear here.

- This is required for using the Console to administer
the Directory Server. Note that your machine name will appear here.
-
- Confirm the Directory Server information
and enter a Directory Server manager password as shown in the following figure:
This is the same password provided in Step 15

- Enter the unique global configuration
name of the configuration settings for this installation of iPlanet Application Server as shown in
the following figure:
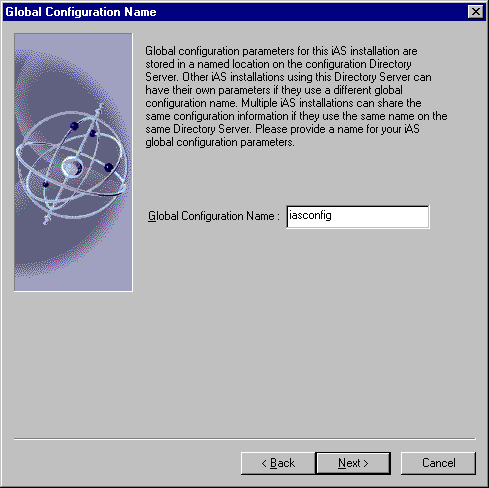
- The name you assign is stored on the configuration
Directory Server, under the o=iPlanetRoot tree along with the global configuration
names of other iPlanet Application Server installations.
- Enter the product key of iPlanet Application Server as
shown in the following figure:

- Select iPlanet Web Server 4.1 and
select the appropriate Web Server Instance from the pop-list. It should be
in the format https-macine_namedomain_name for iWS 4.1:

-
Enter the number of Java Servers (KJS) and C++ Servers
(KCS) used to process applications as shown in the following figure:

- The default values are 1; increase this to handle
high processing loads.
-
-
Enter the port numbers for the Administrative Server
(KAS), the Executive Server (KXS), the Java Servers (KJS), and C++ Servers
(KCS) as shown in the following figure:

- All port numbers you specify are for listener
ports must be within the acceptable range (1 to 65535), and must be unique
(not used by any other applications on your system). Note: If the port
number is already in use, make sure you change the value to a unique port
number. Otherwise, the service you are assigning a port number to will
not start up when you run iPlanet Application Server.
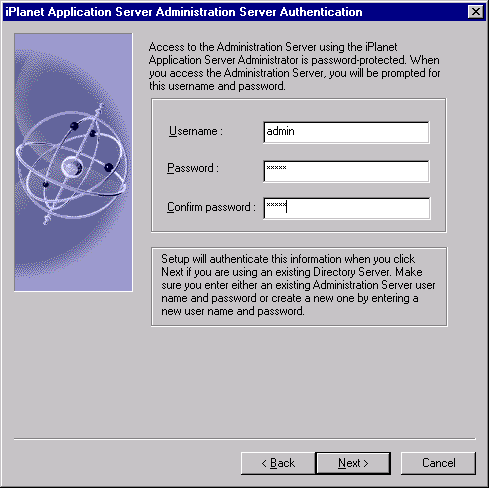
- Enter the password for the Administration Server.
-
-
- Rank the installed databases in
priority order as shown in the following figure:

- The installation program lists all supported
database client types. The clients are required for your applications
to connect to your database back ends. You must rank the clients in order
of connectivity priority, whether you've installed the clients or not.
You can always install the client software after running the iPlanet Application Server installation
program. Note that sample applications are configured for the highest
priority database.
- Specify if the server will have
global transactions:
Global transactions are not required for this
exercise. Select No.

- If you specified Yes, refer to the iPlanet
Application Server Installation Guide for more details
- Select the defaults for the Transaction Manager Directories
-
Specify if the server will have global transactions: For this exercise
select No

- If you indicate Yes, see the iPlanet Application
Server Installation Guide for more details
- Specify if you want to enable I18N support
as shown in the following figure:

- Enabling I18N support allows multi-lingual applications
to be deployed to iPlanet Application Server.
- When prompted whether the server will synchronize
data across servers, click Yes if you intend to synchronize session and state
information across multiple servers for failover and fault tolerance, then
enter the name of the cluster that this instance of iPlanet Application Server participates in as
shown:
If you know that this first server will be part
of a cluster, select Yes. If No is selected, this server may operate in
a standalone mode and be made part of a cluster at a future time.
The cluster name given here will be used for other machines to be installed
as part of this cluster.

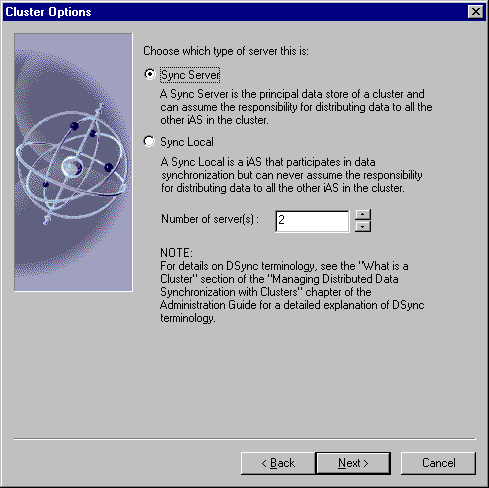
- Indicate if you are currently installing a
Sync Server. If you are installing a Sync Local, then this server will use
data synchronization services, but is not eligible to become a Sync Primary
or the Sync Backup. Then enter the total number of Sync Servers that you plan
to have in the cluster as shown in the following figure:
For this exercise there will be two Sync Servers,
a Primary and a Backup.
- For the first Sync Server in the cluster,
specify the following information:
- IP address of server1
- Executive Server port number
- Priority rating of 1

- For the second Sync Server in the cluster,
specify the following information:
- IP address of server 2
- Executive Server port number
- Priority rating of 2

- Review the summary provided by the installation
program of the configuration you have selected.
- When the installation is complete, reboot
the computer so that the new settings take effect.
Installation of Machine 2
The following procedure describes how to install iPlanet Application Server using the Custom installation
option:
- Insert the iPlanet Application Server Install CD-ROM into the CD-ROM drive.
- Click Start on the Windows task bar and click Run, or choose File
- Run from the Windows Program Manager and click the Run button.
- Click Browse and go to the CD-ROM drive (for example, d:\).
- Open the NT folder and run the file setup.exe.
- Follow the instructions of the installation program.
- When prompted to select Server or Console installation, click iPlanet
Servers as shown in the following figure:

- This gives you the choice to install iPlanet Application Server, iPlanet
Directory Server, Netscape Console, iPlanet Application Server Administration
tool, and the Web connector plug-in. (Selecting Netscape Console installs
Console as a stand-alone application.)
- When prompted for the installation type,
click Custom.

- Select the installation directory as shown
in the following figure:

- The default directory is c:\iPlanet\iPlanet Application Server6. Note
that if you use the default, iPlanet Application Server is installed in
c:\iPlanet\iPlanet Application Server6. You cannot use a directory name that includes spaces.
- Click Next.
- To install iPlanet Application Server along without the Directory
Server, deselect the directory server as in the following figure:
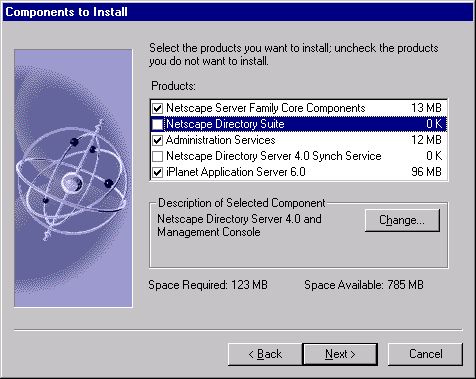
- iPlanet Server Family Core Components
- iPlanet Directory Suite -DESELECTED
- Administration Services
- iPlanet Application Server 6.0
- Although iPlanet Directory Server 4.0 Synch Service
is listed on the screen, do not select this component.
- Click Next.
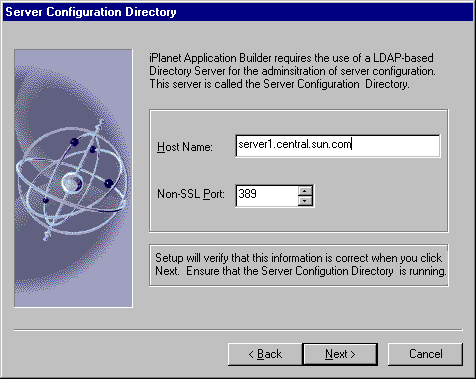
- Since the directory server was deselected
in the previous step, parameters to a directory server on the first machine
must be provided
THE DEFAULT ANSWER DOES NOT WORK HERE, change
to the server name of where the LDAP server was installed.
-
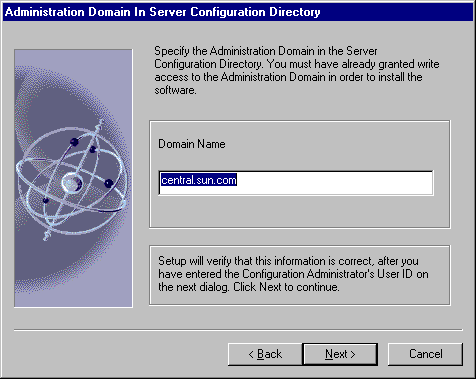
- Enter the name of the Administration Domain where iPlanet
software information is stored on Directory Server as shown in the following
figure:
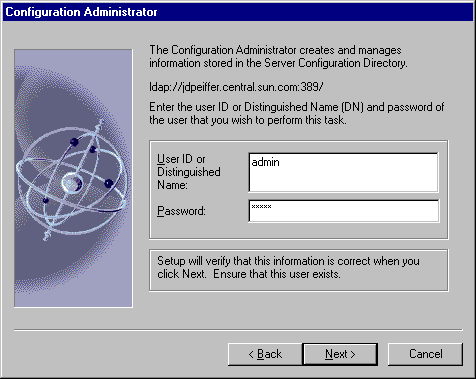
- Enter the Administrator ID and password to
the configuration directory on the first server as shown in the following
figure:
Note your server name will appear.
-
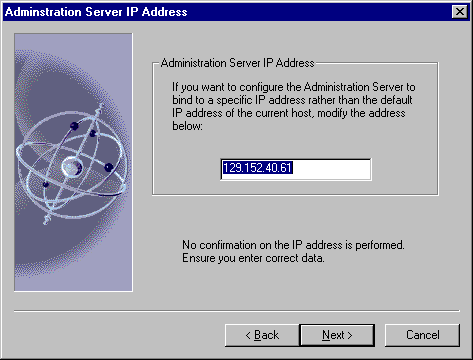
- Enter a specific IP address to bind to
your Administration Server.
- When prompted for the Administration Server
user ID and password, enter the user ID and password that will be required
to log on to the Administration Server through the administration tool (iPlanet Application Server
Administration tool).
- Make sure this user ID and password account
has been created in Directory Server.

- Enter the port number for the Directory
Server Administration Server as shown in the following figure:
Note your server name will appear here.
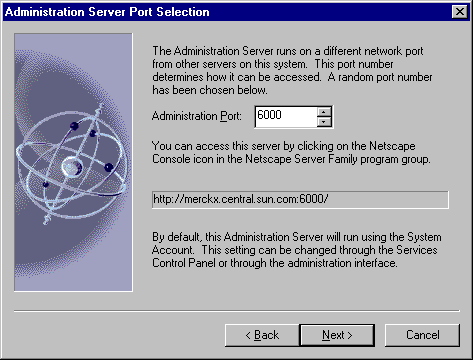
This is required for using the Console to administer
the Directory Server.
-
-
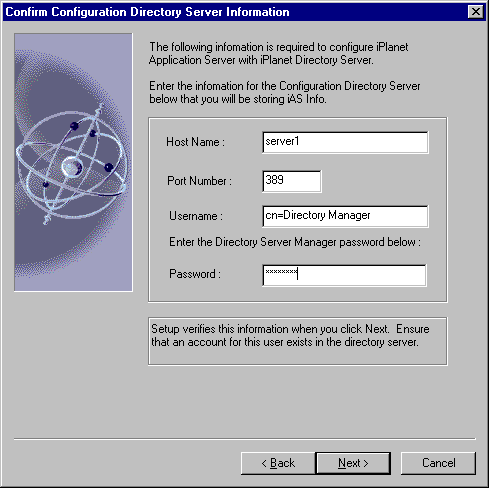
Confirm the Directory Server information
and enter a Directory Server manager password as shown in the following
figure. Note that the hostname must be changed to that of the first
machine:
- Enter the unique global configuration name
of the configuration settings for this installation of iPlanet Application Server as shown in the
following figure:
This should be the same name as entered for server1.

-
- Enter the product key of iPlanet Application Server as shown in
the following figure:

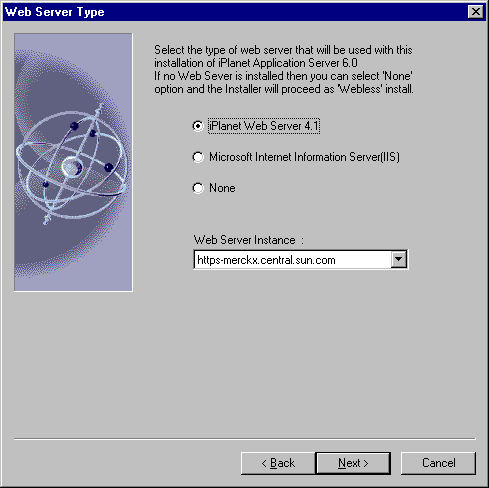
- Select iPlanet Web Server 4.1 and select the
appropriate Web Server Instance from the pop-list. It should be in the format
https-macine_namedomain_name for iWS 4.1:
- Enter the number of Java Servers (KJS) and C++ Servers
(KCS) used to process applications as shown in the following figure:

- The default values are 1; increase this to handle
high processing loads.
- Enter the port numbers for the Administrative
Server (KAS), the Executive Server (KXS), the Java Servers (KJS), and C++
Servers (KCS) as shown in the following figure:

- All port numbers you specify are for listener
ports must be within the acceptable range (1 to 65535), and must be unique
(not used by any other applications on your system).
- Note: If the port number is already in use, make
sure you change the value to a unique port number. Otherwise, the service
you are assigning a port number to will not start up when you run iPlanet Application Server.
- Enter the username and password for the Application
Server Administrator:

- Rank the installed databases in priority
order as shown in the following figure:

- The installation program lists all supported
database client types. The clients are required for your applications
to connect to your database back ends. You must rank the clients in order
of connectivity priority, whether you've installed the clients or not.
You can always install the client software after running the iPlanet Application Server installation
program. Note that sample applications are configured for the highest
priority database.
- Specify if the server will have global transactions:
Global Transactions are not required for this
exercise, select no.

- If you specified Yes, enter the mirror directory
path where the transaction manager restart.bak file for each KJS engine process
gets stored:

- The default disk drive is the drive on which
you are installing iPlanet Application Server. It is strongly recommended that you specify a
path on a separate disk drive. If you do, make sure you create the directory
on that drive, prior to running the installation program.
- Enter the log volume disk name where the
transaction manager log file gets stored for each Java Server as shown in
the following figure:

- See the iPlanet Application Server Installation
Guide for more information on Global Transactions.
-
- Indicate whether or not you want to configure
iPlanet Application Server with resource manager and specify the number of resource managers you
want to use as shown in the following figure:
A resource manager is not required for this exercise.
Select No.

- If you indicate Yes, specify the following
information for each resource manager:
- Resource manager name (user-defined)
- Database type
- Datasource
- User name for the data source
- Password for the data source
- Resource manager recovery GUID
- Open string
- Whether or not the resource manager is
enabled.

- Specify if you want to enable I18N support
as shown in the following figure:

- Enabling I18N support allows multi-lingual applications
to be deployed to iPlanet Application Server.
- When prompted whether the server will synchronize
data across servers, click Yes. The point of this exercise is to synchronize
session and state information across multiple servers for failover and fault
tolerance. The name of the cluster must match the name of the cluster in the
first install. If the first install was done without cluster support, just
enter cluster1.

- Indicate if you are currently installing a
Sync Server or a Sync Local. If you are installing a Sync Local, then this
server will use data synchronization services, but is not eligible to become
a Sync Primary or the Sync Backup. Then enter the total number of Sync Servers
that you plan to have in the cluster as shown in the following figure:
As stated above, this cluster will have 2 sync
servers.

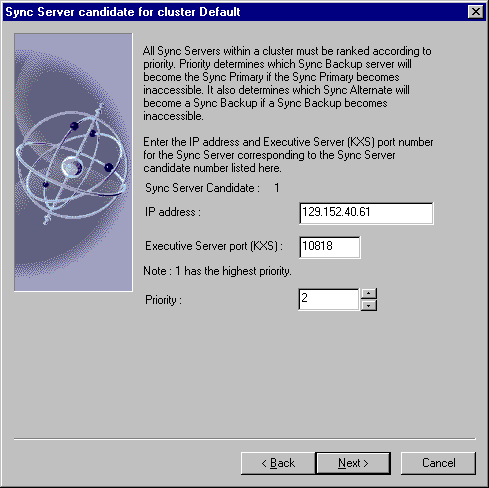
- For each Sync Server in the cluster, specify
the following information:
- IP address of the this server
- Executive Server port number
- Priority rating of 1
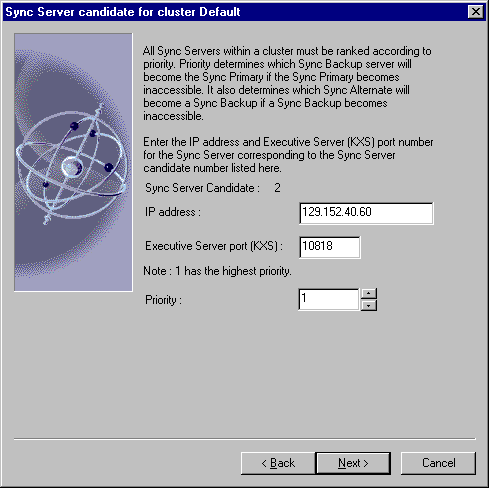
- For the second Sync Server in the cluster,
specify the following information:
- IP address of server 1
- Executive Server port number
- Priority rating of 1
- Review the summary provided by the installation
program of the configuration you have selected.
- When the installation is complete, reboot
the computer so that the new settings take effect.
Verification of cluster installation
- Launch the registry editor and validate the configuration. Open
Application Server, 6.0, Clusters, iPlanet Application Servercluster, SyncServers.
If the correct IP addresses and priorities are no there, correct the entries
to look like the figure below. To add a value highlight SyncServers and select
Edit->Add Value.
- Name : IP address:10818
- Value: 1
- Type: String

This entry is common to all machines in the cluster so it only has to be
done on one machine.
- FOR EACH SERVER IN THE CLUSTER, Open Application
Server, 6.0, CCS0, Cluster Name. It should have the value cluster1=0. If it
is not, select the entry under ClusterName and delete. Deselect and Select
ClusterName and then select Edit->Add Value
- Name : cluster1
- Value: 0
- Type: Integer

- Restart each application server and confirm
that cluster1 is the selected cluster name in the admin tool. For each server
to appear, select file->new->server and enter the appropriate information.
Then select the cluster tab.

Copyright
(c) 2001 Sun Microsystems, Inc. All rights reserved.


