Prior to installing iPlanet Application Server, please review "Preparing
for Installation" and "System Requirements" in the iPlanet Application
Server Installation Guide. Also review the Sample
Cluster Configuration Overview section of the cluster samples to ensure
that you understand the layout of the cluster used in the examples.
This document explains how to install iPlanet Application Server on
UNIX in a simple cluster configuration:
| Step |
Server 1 |
Server 2 |
| Would you like to continue with installation? [Yes]: |
[Enter] |
[Enter] |
| Do you agree to the license terms? [No]: |
yes |
yes |
| Select the component you want to install [1]: |
[Enter] |
[Enter] |
| Choose an installation type:
1. Express installation
Allows you to quickly install the servers using the most common options
and pre-defined defaults. Useful for quick evaluation of the products.
2. Typical installation
Allows you to specify common defaults and options.
3. Custom installation
Allows you to specify more advanced options. This is recommended for
experienced server administrators only.
To accept the default shown in brackets, press the Enter key.
Choose an installation type [2]: |
3 |
3 |
| Install location [/usr/iplanet/iPlanet Application Server6]: |
[Enter] |
[Enter] |
| iPlanet Server Products components:
Components with a number in () contain additional subcomponents which
you can select using subsequent screens.
1. Netscape Server Products Core Components (3)
2. Netscape Directory Suite (2)
3. Administration Services (2)
4. iPlanet Application Server Suite (4)
Specify the components you wish to install [All]: |
[Enter] |
4 |
| Netscape Server Products Core Components components:
Components with a number in () contain additional subcomponents which
you can select using subsequent screens.
1. Netscape Server Products Core Components
2. Netscape Core Java classes
3. Java Runtime Environment
Specify the components you wish to install [1, 2, 3]: |
[Enter] |
N/A |
| Netscape Directory Suite components:
Components with a number in () contain additional subcomponents which
you can select using subsequent screens.
1. Netscape Directory Server
2. Netscape Directory Server Console
Specify the components you wish to install [1, 2]: |
[Enter] |
N/A |
| Administration Services components:
Components with a number in () contain additional subcomponents which
you can select using subsequent screens.
1. Netscape Administration Server
2. Administration Server Console
Specify the components you wish to install [1, 2]: |
[Enter] |
N/A |
| iPlanet Application Server Suite components:
Components with a number in () contain additional subcomponents which
you can select using subsequent screens.
1. iPlanet Application Server Web Connector Component
2. iPlanet Application Server Core Server Component
3. iPlanet Application Server Administration Tool
4. iPlanet Application Server Deployment Tool
5. Pointbase database Server
Specify the components you wish to install [1, 2, 3, 4]: |
1,2,3,4 |
[Enter]
Note: In this case, if you do not want to install a web server
on the second machine, you can answer 2,3,4 |
Enter the fully qualified domain name of the computer
on which you're installing server software. Using the form
<hostname>.<domainname>
Example: eros.airius.com.
To accept the default shown in brackets, press the Enter key.
Computer name [<Your Server Name>]: |
[Enter] |
[Enter] |
Choose a Unix user and group to represent the iPlanet server
in the user directory. The iPlanet server will run as this user.
It is recommended that this user should have no privileges
in the computer network system. The Administration Server
will give this group some permissions in the server root
to perform server-specific operations.
If you have not yet created a user and group for the iPlanet
server, create this user and group using your native UNIX
system utilities.
To accept the default shown in brackets, press the Return key.
System User [nobody]:
System Group [nobody]: |
Enter or modify as required |
Enter or modify as required |
| Netscape server information is stored in the Netscape configuration
directory server, which you may have already set up. If so, you should
configure this server to be managed by the configuration server. To do
so,the following information about the configuration server is required:
the fully quailfied host name of the the form <hostname>.<domainname>(e.g.
hostname.domain.com), the port number, the suffix, and the DN and password
of a user having permission to write the configuration information, usually
the Netscape configuration directory administrator.
If you want to install this software as a standalone server, or if you
want this instance to serve as your Netscape configuration directory server,
press Enter.
Do you want to register this software with an existing Netscape configuration
directory server? [No]: |
[Enter] |
N/A |
| If you already have a directory server you want to use to store your
data, such as user and group information, answer Yes to the following question.
You will be prompted for the host, port, suffix, and bind DN to use for
that directory server.
If you want this directory server to store your data, answer No.
Do you want to use another directory to store your data? [No]: |
[Enter] |
N/A |
| The standard directory server network port number is 389. However,
if you are not logged in as the superuser, or port 389 is in use, the default
value will be a random unused port number greater than 1024. If you want
to use port 389, make sure that you are logged in as the superuser, that
port 389 is not in use, and that you run the admin server as the superuser.
Directory server network port [389]: |
[Enter] or choose a port, remember your decision |
N/A |
| Each instance of a directory server requires a unique identifier. Press
Enter to accept the default, or type in another name and press Enter.
Directory server identifier [server1]: |
[Enter] |
N/A |
| iPlanet Server Products require an LDAP-based Directory Server for
the administartion of server configuration. This server contains the Configuration
Directory.
Enter the non-secured LDAP URL of the server that contains the Configuration
Directory using the form:
ldap://<hostname>:<port>
URL of Directory Server [ldap://<hostname.domainname>:389/] |
N/A |
ldap://host:port/ of the ldap server on the first machine. This
entry must be changed. |
| Please specify the name of the Administration Domain in the Configuration
Directory where your server configuration information is to be stored.
You must have already been granted write access to this Administration
Domain in order to install the software.
To accept the default shown in brackets, press the Enter key.
Administration Domain name [iplanet.com]: |
N/A |
[Enter] |
| Enter the User ID or Distinguished Name of the administrator who is
authorized to access the Configuration Directory at
ldap://<Server 1 hostname>:389/
Configuration Admin ID or DN: [admin]:
Password: |
N/A |
Admin ID and password for the ldap server on server 1 |
Enter the Directory Server Identifier: [server1]
Enter the Directory Server Hostname: [<Server
1 hostname>]
Enter the Directory Server Port: [389]
Enter the Directory Server User: [cn=Directory Manager]
Enter the Directory Server User Password:
Password (again): |
N/A |
Accept ([Enter]) or modify values as necessary |
| Please enter the administrator ID for the Netscape configuration directory
server. This is the ID typically used to log in to the console. You will
also be prompted for the password.
Netscape configuration directory server administrator ID [admin]:
Password:
Password (again): |
Set userid & password |
N/A |
| The suffix is the root of your directory tree. You may have more than
one suffix.
Suffix [o=iplanet.com]: |
[Enter] |
N/A |
Certain directory server operations require an administrative user.
This user is referred to as the Directory Manager and typically has a bind
Distinguished Name (DN) of cn=Directory Manager. Press Enter to accept
the default value, or enter another DN. In either case, you will be prompted
for the password for this user. The password must
be at least 8 characters long.
Directory Manager DN [cn=Directory Manager]:
Password:
Password (again): |
Enter and set password |
N/A |
| The Administration Domain is a part of the configuration directory
server used to store information about Netscape software. If you are managing
multiple software releases at the same time, or managing information about
multiple domains, you may use the Administration Domain to keep them separate.
If you are not using administrative domains, press Enter to select the
default. Otherwise, enter some descriptive, unique name for the administration
domain, such as the name of the organization responsible for managing the
domain.
Administration Domain [iplanet.com]:
|
[Enter] |
N/A |
| Replication is used to duplicate all or part of a directory server
to another directory server. This can be used for failsafe purposes, to
ensure that the directory data is always online and up-to-date in case
one server goes down. It is also useful for distributing directory data
from a central main repository to remote directory servers.
Do you want to configure this directory server
to use replication? [No]: |
[Enter] we're not using this feature for this demonstration |
N/A |
| You may install some sample entries in this directory instance. These
entries will be installed in a separate suffix and will not interfere with
the normal operation of the directory server.
Do you want to install the sample entries? [No]: |
yes |
N/A |
| You may wish to populate your new directory instance with some data.
You may already have a file in LDIF format to use or some suggested entries
can be added. If you want to import entries from an LDIF file, you may
type in the full path and filename at the prompt. If you want the install
program to add the suggested entries, type the word suggest at the prompt.
The suggested entries are common container entries under your specified
suffix, such as ou=People and ou=Groups, which are commonly used to hold
the entries for the persons and groups in your organization. If you do
not want to add any of these entries, type the word none at the prompt.
Type the full path and filename, the word suggest, or the word none
[suggest]: |
[Enter] |
N/A |
| If you are going to import an old database immediately after or during
installation, and you think you may have problems with your old schema,
you may want to turn off schema checking until after the import. If you
choose to do this, schema checking will remain off until you manually turn
it back on. Netscape recommends that you turn it back on as soon as possible.
Do you want to disable schema checking? [No]: |
[Enter] |
N/A |
| The Administration Server is separate from any of your application
servers since it listens to a different port and access to it is restricted.
Pick a port number between 1024 and 65535 to run your Administration
Server on. You should NOT use a port number which you plan to run an application
server on, rather, select a number which you will remember and which will
not be used for anything else.
The default in brackets was randomly selected from the available ports
on your system. To accept the default, press return.
Administration port [17528]: |
[Enter] or set as desired |
N/A |
| If you want to configure the Administration Server to bind to a specific
IP address rather than the default IP address of the current host, enter
the address below.
To accept the default shown in brackets, press the Return key.
IP address [<Server1 IP Address>]: |
[Enter] |
N/A |
The Administration Server program runs as a certain user on your system.
This user should be different than the one which your application servers
run as. Only the user you select will be able to write to your configuration
files. If you run the
Administration Server as "root", you will be able to use the Server
Administration screen to start and stop your Application servers.
Run Administration Server as [root]: |
[Enter] or change as needed |
N/A |
| Do you want to use the Directory Server installed locally in '/usr/iplanet/iPlanet Application Server6'
to connect to iPlanet Application Server ? |
yes |
N/A |
| Global configuration parameters for this iPlanet Application Server installation
are stored in the configuration Directory Server in a named location. Other
iPlanet Application Server installations using this Directory Server can
have their own parameters if they use a different global configuration name.
Multiple iPlanet Application Server installations can share the same configuration information
if they use the same name on the same Directory Server.
Please provide a name for your iPlanet Application Server global configuration parameters
==> [iasconfig]:
|
[Enter] |
[Enter] |
| Enter the product key which is available on the welcome letter you
received with your iPlanet Application Server (iPlanet Application Server) package.
Product Key: |
Enter key as specified |
Enter key as specified |
| iPlanet Application Server supports iPlanet Web Server 4.1.
Enter the FULL PATH of the Web Server Instance to be used, or enter
'cgi' if you are using cgi.
For example: /usr/ns-home/https-my_web_server
: |
Set as required |
Set as Required |
| Configuring the iPlanet Web Server
Press ENTER to continue: |
[Enter] |
[Enter] |
| NOTE: Depending on your previous responses the following question
may not appear
You belong to a different group than the one used to install the web
server! Do you want to enable the Web Server user to access the registry
and plugin libraries? [y] |
[Enter] |
[Enter] |
| NOTE: Depending on your previous responses the following question
may not appear
WARNING! Install will ask you to change permission of some files. This
may pose a potential security problem. It is recommended that you install
as a user belonging to the same group as the web server.
Do you want to continue with the iPlanet Application Server installation ? [y] |
[Enter] |
[Enter] |
| Choose the TCP/IP communication ports for iPlanet Application Server Administrator, Executive
Server, and CGI to KXS communication.
Port number for iPlanet Application Server Administrator (KAS) [10817]:
Port number for Executive Server (KXS) to iPlanet Application Server communication [10818]
Port number for CGI to KXS communication [10819] |
Enter or set as required |
Enter or set as required |
| Enter the number (0-32) of Java Servers (KJS) to install.
Number of Java Servers [1]:
Port number for Java Server (KJS) 1 to KXS communication [10820] |
Enter or set as required |
Enter or set as required |
| Enter the number (0-32) of C++ Servers (KCS) to install.
Number of C++ Servers [1]:
Port number for C++ Server (KCS) 1 to KXS communication [10821] |
Enter or set as required |
Enter or set as required |
| Access to the Administration Server using the iPlanet Application Server
Administrator (iPlanet Application ServerAT) is password-protected. When you access the Administration
Server, you will be prompted for the username and password."
Username [admin]:
Password:
Password (again): |
Set as requested |
Set as requested |
| Specify the JDBC driver types to configure:
1. iPlanet Type 2 JDBC Driver
2. Third Party JDBC Drivers
3. Do not configure JDBC drivers at this time
You can also configure JDBC drivers after installation by running the db_setup.sh
utility. To accept the default shown in brackets, press the Enter key
Select the component you want to install ? (1/2/3) [1]: |
3 |
3 |
| Transaction Manager coordinates global transactions within a Java Server
(KJS).
Specify a mirror directory for storing the Transaction Manager restart.bak
file for each Java Server.
It is recommended that the MirrorDirectoryRoot be located on a different
hard drive than your iPlanet Application Server installation.
Enter the full pathname for MirrorDirectoryRoot
==> [/usr/iplanet/iPlanet Application Server6/iPlanet Application Server/CCS0/TXNMGR_MIRROR]: |
[Enter] |
[Enter] |
| Transaction Manager LogVolumeDiskName
Specify where the Transaction Manager log file will be stored. It is
recommended that the LogVolumeDiskName(s) be located on a different hard
drive than your iPlanet Application Server installation, and that you use a 'raw device' if possible.
Enter the full pathname for the next LogVolumeDiskName
==> [/usr/iplanet/iPlanet Application Server6/iPlanet Application Server/CCS0/TXNMGR/ENG1/logVol]: |
[Enter] |
[Enter] |
| Configure iPlanet Application Server Resource Manager
This section allows you to configure Resource Manager for use with the
Transaction Manager. Resource Manager will allow you to connect to a database
backend for global transactions.
Do you want to configure Resource Manager ? [y]: |
n - optional step not required for clustering. Can be set via admin
tool at a later time. |
n - optional step not required for clustering. Can be set via admin
tool at a later time. |
| Enable Internationalization (I18N) support if you want to deploy multi-lingual
applications using iPlanet Application Server
Do you want to enable I18N support for iPlanet Application Server? [No]: |
Set as needed |
Set as needed |
| Cluster Configuration for Data Synchronization
iPlanet Application Server supports Distributed Data Synchronization (DSync).
DSync maintains data across multiple iPlanet Application Servers, an
important aspect of partitioned and distributed applications.
To configure DSync, you must know the IP addresses and Executive Server
(KXS) port numbers of ALL participating servers.
Will this server participate in DSync ? [n]: |
Y |
Y |
| For iPlanet Application Server to participate in DSync, it must be a member of a cluster.
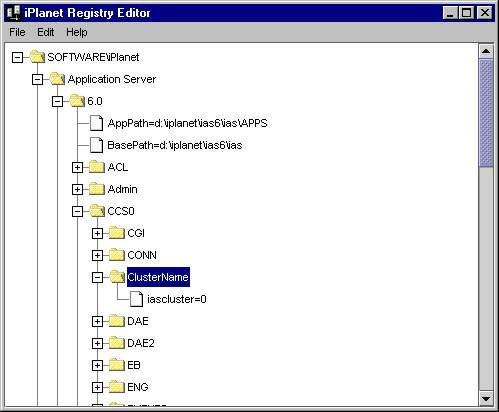
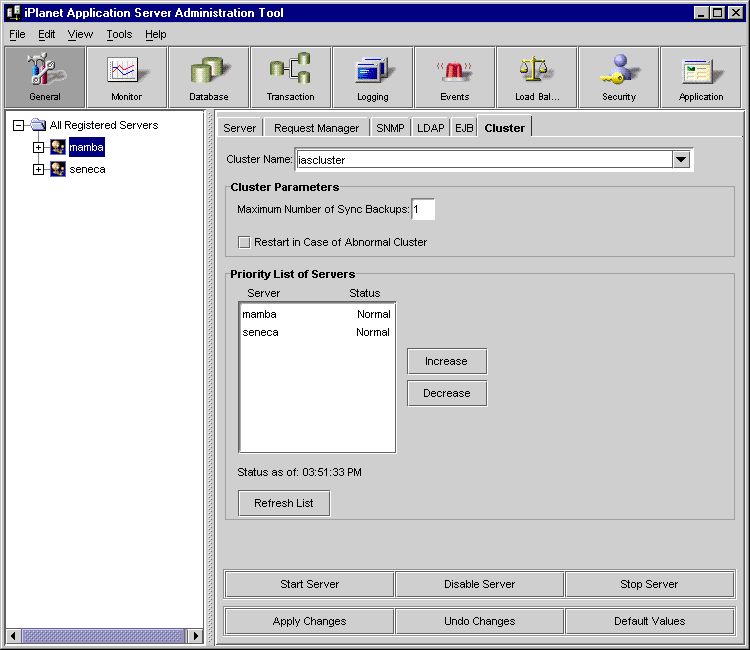
Enter the name of the Cluster this iPlanet Application Server will be a member of [NAScluster]: |
iPlanet Application Servercluster |
iPlanet Application Servercluster |
| Servers that participate in data synchronization fit into two categories :
1. Sync Server : A Sync Server is the principal data store of a cluster
and can assume the responsibility for distributing data to all the other
iPlanet Application Server in the cluster.
2. Sync Local : A Sync Local is a iPlanet Application Server that participates in data synchronization
but can never assume the responsibility for distributing data to all the
other iPlanet Application Server in the cluster.
NOTE : For details on DSync terminology, see the "What is a Cluster"
section of the "Managing Distributed Data Synchronization with Clusters"
chapter of the Administration Guide.
Choose which type of server this is: [2] |
1 |
1 |
| How many servers will participate in the cluster iPlanet Application Servercluster? [1] |
2 |
2 |
| Gather information to configure DSync Server candidate #1
Enter the IP address : |
<Server 2 IP Address> |
<Server 1 IP Address> |
Enter the port number of the Executive Server (KXS) to iPlanet Application Server communication
for the iPlanet Application Server installed on DSync Server # 1: |
10818 |
10818 |
Choose the ORDER OF PRIORITY for DSync IP Addresses.
The following are the IP Addresses entered:
1. <Server 1 IP Address>:10818
2. <Server 2 IP Address>
Select the machine with the highest priority [1 2 ]: |
1 |
N/A |
| Order of Priority: 1, 2
Press ENTER to continue |
[Enter] |
N/A |
Choose the ORDER OF PRIORITY for DSync IP Addresses.
The following are the IP Addresses entered:
1. <Server 2 IP Address>:10818
2. <Server 1 IP Address>
Select the machine with the highest priority [1 2 ]: |
N/A |
2 |
| Order of Priority: 2, 1
Press ENTER to continue |
N/A |
[Enter] |
| Choose either 0 or 1 Sync Backup servers
Sync Backup servers store exactly the same information as the Sync primary.
If the Sync Primary becomes inaccessible, the next Sync Backup, as determined
by its priority setting, assumes the Sync Primary role.
What is the maximum number of Sync Backups (0 - 1) : |
1 |
1 |
| Indicate if you want to run iPlanet Application Server at the system startup
Do you want to run iPlanet Application Server automatically at system startup ? [n]: |
[Enter] |
[Enter] |
| Finished with gathering of information.
Next, the iPlanet Application Server files will be extracted. After
that, the iPlanet Application Server configuration and registration based on your responses will
begin.
Press ENTER to continue: |
[Enter] |
[Enter] |