If you have already configured the servlet-based means of accessing a simple IONA Orbix-based CORBA sample, then you can run the application by clicking here.
This example application demonstrates how a very simple servlet can call methods of a remote CORBA object based on using Orbix as the underlying ORB. Since the servlet accesses the "SimpleObject" CORBA object that is part of the Orbix demo applications, you must first ensure that you've run the Orbix demo application outside of iPlanet Application Server.
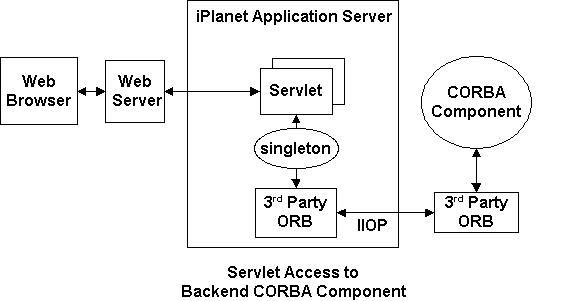
Initialization of multiple ORBs is avoided through the use of a singleton class. Regardless of the number of instances of the stateless session bean created by the EJB container, the singleton approach ensures that at most one instance of the ORB is created for the entire application. To learn more about how the singleton design pattern has been used in this sample, review Using a Singleton for ORB.init().
The following diagram depicts the main components of this sample:
Setting Up the Environment
Getting Started includes a checklist of prerequisites for deploying sample applications to iPlanet.
Setting up third party ORBs in iPlanet Application Server describes how to setup and run the Orbix "SimpleObject" demo application in a standalone mode prior to following the instructions to run it with iPlanet.
Modifying the Build File describes how to prepare your environment to recompile the sample.
Deploying and Running the Application
Select one of two approaches to deploying the application:
Command Line-based Deployment describes how to manually register the application in iPlanet using a Command Line Interface (CLI). This is the fastest means of deploying the application.
GUI-based Deployment describes how to use the iPlanet Deployment Tool to import and deploy the sample application. It also addresses assembling the application from scratch using the Deployment Tool.
Running the Application describes how to start the application, navigate through it and how to troubleshoot in the event of problems.
Compiling and Assembling the Application describes how to use command line tools to recompile the sources and rebuild the WAR module and the overall EAR file.
Using a Singleton for ORB.init() describes how to implement the singleton to manage ORB initialization.
EJB Accessing CORBA Objects Using Orbix is a simple sample of an EJB accessing the same backend CORBA object as demonstrated in the servlet example.
Overriding Built-in ORB describes a number of approaches by which you can override the bundled ORB with a commercial ORB of your choice.
Before deploying the sample, you will need to modify the build file to reflect the installation location of your ORB. Under the directory:
install_dir/ias/ias-samples/corba/backend/orbix/servlet/src/
Edit the build.xml file by modifying the following property to suit your ORB installation environment:
Windows:
<!-- OMG CORBA Classes -->
<property name="orb.installpath" value="d:\progra~1\iona\orbix_art\1.2\"/>
Solaris:
<!-- OMG CORBA Classes -->
<property name="orb.installpath" value="/opt/iona/orbix_art/1.2/"/>
These modifications will enable you to easily compile and reassemble the sample application.
If you don't make this change, the servlet source code will not compile because it will not be able to access the OMG ORB classes.
Now you are ready to follow either the Command Line-based Deployment or GUI-based Deployment instructions.
There are two steps to deploying the application via the command line:
The sample web application relies on several J2EE environment settings to access the Orbix ORB domain location and several IOR files. Preset values are included in the prebuilt EAR, but these default values are unlikely to suit your ORB installation path. (Since this is a simple sample, IOR files are used in place of dynamic lookups through a CORBA naming service).
The following table lists the environment settings required by the sample web application. You should consult this table when you are using either the Deployment Tool or performing a command line-based registration. These settings are housed in the web.xml file found under the src/ directory of the sample application. If you are using Ant to rebuild the sample application, then you can simply change the settings as they appear in the web.xml file and rebuild the application.| Environment Name | Default Values | Description |
| orbDomainName | localhost | Name of ORB domain. |
| orbCfgDir |
c:\progra~1\iona\orbix_art\1.2\localhost or /opt/iona/orbix_art/1.2/localhost |
Location of localhost.cfg domain configuration file. |
| simpleObjectIor1 |
|
IOR file used to access first CORBA object. Produced when the Orbix sample build script is executed. |
| simpleObjectIor2 |
c:\\program files\\iona\\orbix_art\\1.2\\simple2.ior or /opt/iona/orbix_art/1.2/simple2.ior |
IOR file used to access second CORBA object. Produced when the Orbix sample build script is executed. |
When manually registering the application, to modify these environment settings, you have several options:
Modifying these settings in the web.xml file is preferred because the change will be present each time you deploy the application to the application server.
To modify the domain setting in the web.xml file:
Windows:
...
<env-entry>
<env-entry-name>orbCfgDir</env-entry-name>
<env-entry-value>c:\progra~1\iona\orbix_art\1.2\localhost</env-entry-value>
<env-entry-type>java.lang.String</env-entry-type>
</env-entry>
<env-entry>
<env-entry-name>simpleObjectIor1</env-entry-name>
<env-entry-value>c:\\program files\\iona\\orbix_art\\1.2\\simple1.ior</env-entry-value>
<env-entry-type>java.lang.String</env-entry-type>
</env-entry>
<env-entry>
<env-entry-name>simpleObjectIor2</env-entry-name>
<env-entry-value>c:\\program files\\iona\\orbix_art\\1.2\\simple2.ior</env-entry-value>
<env-entry-type>java.lang.String</env-entry-type>
</env-entry>
...Solaris:
...
<env-entry>
<env-entry-name>orbCfgDir</env-entry-name>
<env-entry-value>/opt/iona/orbix_art/1.2/localhost</env-entry-value>
<env-entry-type>java.lang.String</env-entry-type>
</env-entry>
<env-entry>
<env-entry-name>simpleObjectIor1</env-entry-name>
<env-entry-value>/opt/iona/orbix_art/1.2/simple1.ior</env-entry-value>
<env-entry-type>java.lang.String</env-entry-type>
</env-entry>
<env-entry>
<env-entry-name>simpleObjectIor2</env-entry-name>
<env-entry-value>/opt/iona/orbix_art/1.2/simple2.ior</env-entry-value>
<env-entry-type>java.lang.String</env-entry-type>
</env-entry>
...
build
On UNIX, prior to executing the build command, you need to ensure that <iPlanet install path>/ias/bin is in your PATH.
Executing the build command will compile the application source files and reassemble both the WAR and EAR files. The EAR file will be placed in:
ias-samples/corba/backend/orbix/servlet/assemble/ear/
If you want to learn more about the build facility, see the Compiling and Assembling the Application section for more details on rebuilding the application. Otherwise, continue with the next section to deploy the application.
Once you've modified the CORBA environment settings, deploying the prebuilt corba-backend-servlet-orbix.ear file is simple.
1. Go to the directory in which the newly assembled EAR file is located:
install_dir/ias/ias-samples/corba/backend/orbix/servlet/assemble/ear
2. Before executing the command line deploy tool, ensure that you have defined an iAS instance in the application server's administrative tool. Refer to the Samples Getting Started section for more information on using the iasdeploy command.
3. Execute iasdeploy to deploy application to the local application server instance:
iasdeploy deployapp corba-backend-servlet-orbix.ear
Alternatively, under the src/ directory, you can simply execute "build deploy" to deploy the application to the local application server.
The deployment process involves the following operations:
If you would like to verify the registration of the application, proceed to Verifying Registration.
Otherwise, you're ready to exercise the application by Running
the Application.
Two approaches to using the Deployment Tool are described:
Import Pre-existing EAR File to quickly deploy the application to iPlanet using the Deployment Tool. None of the application assembly steps are covered by this section. On average, this approach will take 5-10 minutes.or
Assemble the Application to learn how to use Deployment Tool to assemble the application from scratch and to deploy it to the application server. On average, this approach will take from 15-30 minutes.
1. Launch the Deployment Tool.
UNIX:
Execute install_dir/ias/bin/deploytool
Windows:
Start->Programs->iPlanet Application Server 6.0->iAS Deployment Tool
2. Open the EAR file
3. Modify Environment Settings
Modify environment settings of the web application to specify the Orbix domain name, location and IOR files. These changes will result in modifications being made to the XML deployment descriptor associated with the web application module in the application's EAR file.
To compile the application sources, simply execute "build compile" under the application's src/ directory. See the section Compiling and Assembling the Application for more information on recompiling the application using the supplied build facility.
For each tab listed below, set the name fields to the associated values.
1. General Tab
2. Environment Tab
Name corba-client-servlet
Add the following environment settings with values based on your Orbix
installation location.
| Environment Name | Type | Value | Description |
| orbDomainName | String | localhost | Name of ORB domain. |
| orbCfgDir | String |
c:\progra~1\iona\orbix_art\1.2\localhost or /opt/iona/orbix_art/1.2/localhost |
Location of localhost.cfg domain configuration file. |
| simpleObjectIor1 | String |
|
IOR file used to access first CORBA object. Produced when the Orbix sample build script is executed. |
| simpleObjectIor2 | String |
c:\\program files\\iona\\orbix_art\\1.2\\simple2.ior or /opt/iona/orbix_art/1.2/simple2.ior |
IOR file used to access second CORBA object. Produced when the Orbix sample build script is executed. |
Next, we need to set the context root of the web application. This value will appear in URLs that access web application components. For example, in the URL http://localhost/NASApp/corba-backend-servlet-orbix/CorbaClientServlet the "corba-backend-servlet-orbix" value is the context root of the web application.
1. Select the corba-backend-servlet-orbix.ear file under the J2EE Application window.
2. Select File -> Deploy
3. If you have not already registered the target application servers, do so now by clicking on the Register button. Enter the host name, administrative port number and username/password for the target application server.
Note: You may authorize additional users to deploy applications to an application server by using the iPlanet Application Server Administrative Console. See the Security tab in the Administrative Console for details.4. Select one of the registered servers. Click on Overwrite modules in case you are repeating the deployment step.
5. Click on Deploy to start the deployment process to the target server.
6. Now the file transfer and application registration begins. See the Deploy tab for the status of the deployment. The deployment may take a minute or so to complete. Once the status of each deployment changes to Success, you're ready to run the application.
UNIX:install_dir/ias/bin/ksvradminWindows:Start->Programs->iPlanet Application Server->iAS Administration Tool
After you've started the Orbix services and the server side CORBA object, start the application by clicking here or, if you've deployed the web server on a separate machine, by accessing:
http://<web server hostname>:<port>/NASApp/corba-backend-servlet-orbix/CorbaClientServlet
You should see the following output in your browser:
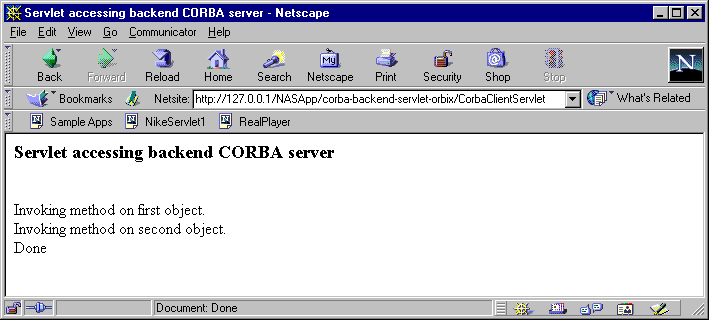
As you run the application again, you should see the following output in the kjs terminal window:
[14/Feb/2001 18:18:21:8] info: --------------------------------------

[14/Feb/2001 18:18:21:8] info: CorbaClientServlet: init

[14/Feb/2001 18:18:21:8] info: --------------------------------------

CorbaClientServlet: Initializing ORB

CorbaClientServlet: orbDomainName=localhost

CorbaClientServlet: orbCfgDir=c:\progra~1\iona\orbix_art\1.2\localhost

CorbaClientServlet: iorFile1=c:\\program files\\iona\\orbix_art\\1.2\\simple1.i

CorbaClientServlet: iorFile1=c:\\program files\\iona\\orbix_art\\1.2\\simple1.i

ejbCreate() started on obj samples.corba.backend.orbix.common.OrbSingleton@29f3

OrbSingleton() constructor: Calling ORB.init().

OrbSingleton() constructor: orbDomainName=localhost

OrbSingleton() constructor: orbCfgDir=c:\progra~1\iona\orbix_art\1.2\localhost

OrbSingleton() constructor: ORB.init() successful.

CorbaClientServlet: Invoking import_object() for first object

CorbaClientServlet: Reading object reference from c:\\program files\\iona\\orbix_art\\1.2\\simple1.ior

Invoking import_object() for second object

CorbaClientServlet: Reading object reference from c:\\program files\\iona\\orbix_art\\1.2\\simple2.ior

CorbaClientServlet: Invoking narrow on first object.

CorbaClientServlet: Invoking narrow on second object.


CorbaClientServlet: Invoking method on first object.

CorbaClientServlet: Invoking method on second object.
Servlet Initialization Failures
You can cause servlet to issue a ServletException during the servlet's
init() method by performing any one of the following actions:
Upon restarting the CORBA object server and attempting to rerun the servlet application, you should observe that the client will successfully reinitialize the object references and access the remote methods.
See the Further Exploration section for more topic to explore.
Ensure that you've started the Orbix services as well as the CORBA server prior to running the application. Double check the web application environment settings as well. For additional assistance, review the General Troubleshooting section.
CORBA COMM FAILURE Error
If you encounter the following messages in the Java Engine log file, then you
have not configured the application server to use the Orbix ORB classes. Note
the com.sun.corba classes
in the following output. These are not the correct ORB classes. Refer to the
Orbix 2000 Configuration document
for more details.
[29/Jan/2001 14:33:31:4] info: REQ-012: thread add
[29/Jan/2001 14:33:31:8] info: ENGINE-ready: ready: 10819
[29/Jan/2001 14:33:58:0] info: --------------------------------------
[29/Jan/2001 14:33:58:0] info: CorbaClientServlet: init
[29/Jan/2001 14:33:58:0] info: --------------------------------------
Initializing ORB
Exception in Initialize BootNaming
org.omg.CORBA.COMM_FAILURE: minor code: 1398079490 completed: No
org.omg.CORBA.COMM_FAILURE: minor code: 1398079490 completed: No
at com.sun.corba.ee.internal.iiop.IIOPConnection.writeLock(IIOPConnection.java:919)
at com.sun.corba.ee.internal.iiop.IIOPConnection.send(IIOPConnection.java:980)
at com.sun.corba.ee.internal.iiop.IIOPOutputStream.invoke(IIOPOutputStream.java:75)
at com.sun.corba.ee.internal.iiop.ClientRequestImpl.invoke(ClientRequestImpl.java:74)
at com.sun.corba.ee.internal.corba.ClientDelegate.invoke(ClientDelegate.java:160)
at com.sun.corba.ee.internal.corba.InitialNamingClient.resolve(InitialNamingClient.java:199)
at com.sun.corba.ee.internal.corba.InitialNamingClient.cachedInitialReferences(InitialNamingClient.java:278)
NoClassDefFoundError
If you encounter the following messages in the Java Engine log file, then
you have not configured the application server to use the Orbix ORB classes.
Note the com.sun.corba
classes in the following output. These are not the correct ORB classes. Refer
to the Orbix 2000 Configuration document
for more details.
[03/Feb/2001 12:40:37:7] info: --------------------------------------
[03/Feb/2001 12:40:37:7] info: CorbaClientServlet: init
[03/Feb/2001 12:40:37:7] info: --------------------------------------
Initializing ORB
orbDomainName=localhost
orbCfgDir=/opt/iona/orbix_art/1.2/localhost
iorFile1=/opt/iona/orbix_art/1.2/simple1.ior
iorFile1=/opt/iona/orbix_art/1.2/simple1.ior
[03/Feb/2001 12:40:38:0] error: Exception: SERVLET-execution_failed: Error in executing servlet CorbaClientServlet: java.lang.NoClassDefFoundError: com/iona/corba/util/SystemExceptionDisplayHelper
Exception Stack Trace:
java.lang.NoClassDefFoundError: com/iona/corba/util/SystemExceptionDisplayHelper
at samples.corba.backend.orbix.servlet.CorbaClientServlet.init(CorbaClientServlet.java:64)
at com.netscape.server.servlet.servletrunner.ServletRepository.loadServlet(Unknown Source)
at com.netscape.server.servlet.servletrunner.ServletRepository.createInstance(Unknown Source)
at com.netscape.server.servlet.servletrunner.ServletRunner.createServlet Info(Unknown Source)
LICENSE_FILE_NOT_AVAIL
Browser message indicates "document contains no data" and Java
Engine log file has following content. Double check the CLASSPATH of the application
server to ensure that the name of the directory under which the
licenses.txt file is located is par of the CLASSPATH. Refer to the Orbix
2000 Configuration document for more details.
[02/Feb/2001 17:29:36:5] info: --------------------------------------
[02/Feb/2001 17:29:36:5] info: CorbaClientServlet: init
[02/Feb/2001 17:29:36:5] info: --------------------------------------
Initializing ORB
orbDomainName=localhost
orbCfgDir=/opt/iona/orbix_art/1.2/localhost
iorFile1=/opt/iona/orbix_art/1.2/simple1.ior
iorFile1=/opt/iona/orbix_art/1.2/simple1.ior
Caught exception: org.omg.CORBA.INITIALIZE: Configuration not found minor code:
1230242063 completed: No (LICENSE_FILE_NOT_AVAIL)
[02/Feb/2001 17:29:38:8] error: Exception: SERVLET-execution_failed: Error in executing servlet CorbaClientServlet: javax.servlet.ServletException: ORB.init() failed.
Exception Stack Trace:
javax.servlet.ServletException: ORB.init() failed.
at java.lang.Throwable.fillInStackTrace(Native Method)
at java.lang.Throwable.fillInStackTrace(Compiled Code)
at java.lang.Throwable.<init>(Compiled Code)
at java.lang.Exception.<init>(Compiled Code)
CORBA.TRANSIENT exception
Ensure that the demos.simple.Server
application has been started. Refer to the Orbix
2000 Configuration document for more details. Upon restarting the CORBA
server application and executing the servlet again, the servlet should work
properly.
Browser output:
Servlet accessing backend CORBA server
Invoking method on first object.
Caught org.omg.CORBA.TRANSIENT exception.org.omg.CORBA.TRANSIENT: cannot establish
binding minor code: 1230242562 completed: No
Invoking method on second object.
Caught org.omg.CORBA.TRANSIENT exception.
DoneJava Engine log:
Invoking method on first object.
Caught org.omg.CORBA.TRANSIENT exception.org.omg.CORBA.TRANSIENT: cannot establi
sh binding minor code: 1230242562 completed: No
Trying to reinitialize object refs.Invoking import_object() for first object
Reading object reference from /opt/iona/orbix_art/1.2/simple1.ior
Invoking import_object() for second object
Reading object reference from /opt/iona/orbix_art/1.2/simple2.ior
Invoking narrow on first object.
Invoking narrow on second object.
Invoking method on second object.
Caught org.omg.CORBA.TRANSIENT exception.
Trying to reinitialize object refs.
Invoking import_object() for first object
Reading object reference from /opt/iona/orbix_art/1.2/simple1.ior
Invoking import_object() for second object
Reading object reference from /opt/iona/orbix_art/1.2/simple2.ior
Invoking narrow on first object.
Invoking narrow on second object.
Class Cast Exception
Ensure that the demos.simple.Server
application has been started. Refer to the Orbix
2000 Configuration document for more details. Upon restarting the CORBA
server application and executing the servlet again, the servlet should work
properly. The cause of this problem is likely the same as the cause of the CORBA.TRANSIENT
exception, but the circumstances of the timing are different.
Browser output:
Servlet accessing backend CORBA server
Invoking method on first object.
Caught unexpected exception.java.lang.ClassCastException: com.sun.corba.ee.internal.corba.AnyImplJava Engine log:
Invoking method on first object.
Caught unexpected exception.java.lang.ClassCastException: com.sun.corba.ee.internal.corba.AnyImpl
To easily recompile, assemble and deploy the application, see the Sample Application Build Facility document for details on using a build facility to quickly perform these tasks.
For example, to rebuild the entire application from scratch, follow these steps:
1. Compile and Assemble Web Application
Execute "build" under servlet/src/
The default target core will be executed to rebuild the WAR and EAR files.
2. Redeploy Application
Execute "build deploy" under servlet/src/
3. Restart Application Server
An application server restart will be necessary if you've modified deployment descriptors. For servlet and/or JSP modification, no restart is is necessary.
To clean the web application project area, execute "build clean".
Copyright
(c) 2001 Sun Microsystems, Inc. All rights reserved.