If you already went through the deployment process of HelloDB you can run the application by clicking here.
The HelloDB sample is a simple application based on HTML, Servlets, EJBs, and JSPs. It is an extension of the HelloWorld sample application. The motivation for HelloDB was the need to have a little test application that could be deployed quickly to test database connectivity.
As with the HelloWorld sample, deploying HelloDB to iPlanet Application Server provides an introduction to the server's deployment and registration tools.
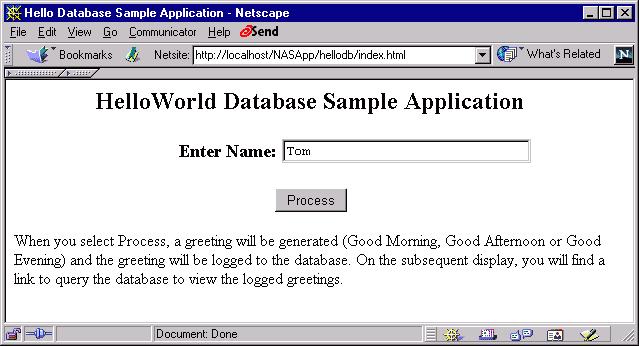
a. Bring up a web page with a form like this:
b. Enter your name and press the Process button.
c. A servlet is invoked. This servlet is be one of two "controllers" (there are two servlets) for the application.
d. The controller servlet calls a stateless session bean to determine a greeting based upon the current system time (just like in the HelloWorld sample). This EJB fulfills the role of the "model" for our app.
e. The servlet dispatches a JSP to deliver the greeting back to the browser. The JSP servers as the "view" component of our application.
f. As a result of the JSP execution, you see the following page returned to your browser:
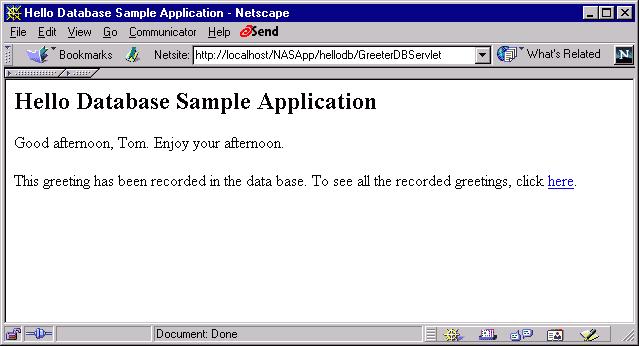
This is just like the HelloWorld sample so far. However, behind the scenes, a database table has been updated to record this greeting. Also note in the screen image above, that a link has been added to retrieve and view the recorded greetings.
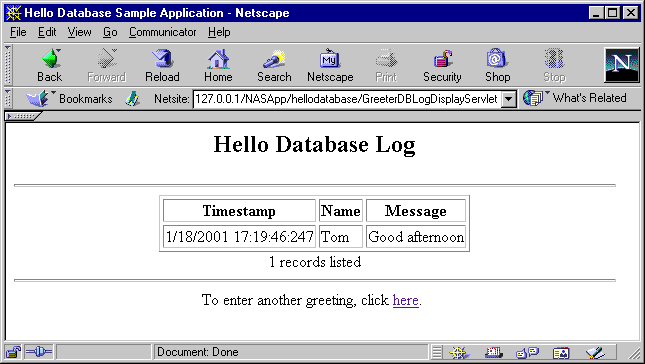
g. Traverse that "here" link to invoke the other "controller" (a servlet) to retrieve the all records from the table and display them via a JSP.
h. As a result of this second JSP's execution, you see the following page returned to your browser:
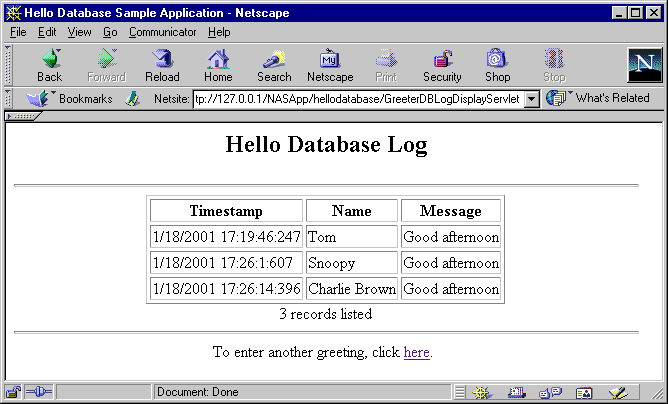
i. Click on the "here" link to return to the initial page and enter a new name for a greeting. Then, view the recorded greetings again to see that additional greetings are retrieved from the database:
Setting Up the Environment
Getting Started includes a checklist of prerequisites for deploying sample applications to iPlanet.
Configuring the Database describes how to setup the database schema, load the content and register the JDBC data sources for the HelloDB application.
Deploying and Running the HelloDB Application
Command Line-based Deployment describes how to manually register the HelloDB application in iPlanet using a Command Line Interface (CLI). This is the fastest means of deploying HelloDB to the application server.
Running the Application describes how to start the application, navigate through it and how to troubleshoot in the event of problems.
The driver for the preinstalled PointBase database has already been registered and the data for all samples has been loaded into it during installation of the iPlanet Application Server . You do not need to install the driver separately. The logical name for this driver is "PointBaseDriver". If you intend to use PointBase to exercise this sample, then all you need to do is register the datasource.
You have the option of using either the iPlanet Type 2 JDBC driver or an external driver such as the Oracle Type 4 JDBC driver. A Type 4 driver is easier to configure in that it requires only a JAR file containing the RDBMS client classes. Type 2 drivers require native client libraries.
UNIX:
Execute the db_setup.sh script to register a third party JDBC driver.Windows:a) Enter the application server installation root directory:
Please enter the iAS installation root directory:b) Select option 2, Third Party JDBC Drivers
/usr/iplanet/ias6Do you want to use third party JDBC drivers or native drivers.c) Enter a logical name for the driver. This name will be supplied in the next step when configuring the JDBC datasource XML file.
1. iPlanet Type 2 Drivers
2. Third Party Drivers
To accept the default shown in brackets, press the Enter key.Select the component you want to install (1/2) [1]:
For example, for Oracle Type 4, the sample uses "ora-type4"d) Enter the driver class name.For example, for Sybase jConnect, the sample uses "jconnect".
For example, for Oracle, "oracle.jdbc.driver.OracleDriver"e) Enter the fully qualified path of the driver JAR or ZIP file.For example, for Sybase, "com.sybase.jdbc2.jdbc.SybDriver"
For example, forOracle, "<ORACLE_HOME>/jdbc/lib/classes12_01.zip"f) Enter the path for the driver's native libraries. Optional, applies to Type 2 drivers only.For example, for Sybase, "<jConnect install>/classes/jconn2.jar"
g) Restart the application server using the iascontrol kill and iascontrol start commands. Refer to the Getting Started section for more information. You must use the kill subcommand to ensure that the Java Engines (kjs') are completely stopped.
h) The next step is to identify an RDBMS user under which you will create and populate the application tables.
Execute the jdbcsetup.exe program to register a third party JDBC driver.a) Enter a logical name for the driver. This name will be supplied in the next step when configuring the JDBC datasource XML file.
For example, for Oracle Type 4, the sample uses "ora-type4"b) Enter the driver class name.For example, for Sybase jConnect, the sample uses "jconnect".
For example, for Oracle, "oracle.jdbc.driver.OracleDriver"c) Enter the fully qualified path of the driver JAR or ZIP file.For example, for Sybase, "com.sybase.jdbc2.jdbc.SybDriver"
For example, forOracle, "<ORACLE_HOME>/jdbc/lib/classes12_01.zip"d) Enter the path for the driver's native libraries. Optional, applies to Type 2 drivers only.For example, for Sybase, "<jConnect install>/classes/jconn2.jar"
e) Restart the application server using either the Application Server Administrative Tool or the iascontrol stop and iascontrol start commands. Refer to the Getting Started section for more information.
f) The next step is to identify an RDBMS user under which you will create and populate the application tables.
On UNIX, if during installation, either "Typical" or "Express" options were selected, JDBC database drivers will not be registered with the application server. If you are unsure as whether or not the client driver was registered, use the application server administrative tool to determine the drivers registered with the application server.
install_dir/ias/bin/ksvradmin
UNIX: Database Driver Registration
install_dir/ias/bin/db_setup.sh
To define a new Oracle user:
SQL > create user iplanet identified by iplanet;
Where the first iplanet is the user name and the second iplanet is the password.
SQL> grant connect, resource, dba to iplanet identified by iplanet;
If Pointbase is the target database, then nothing needs to be done since the database is prepopulated. However, if you do want to navigate the database tables or want to unload and create the tables from scratch (using the HelloDb_PB.sql script in the schema directory), follow the instructions in the Using Pointbase with iPlanet guide.
A shell script named setup_<rdbms type>.sh/.bat configures the database tables, populates the tables with sample data and updates the iPlanet Application Server Registry with database information to support the HelloDB sample application. The setup_<rdbms type>.sh/.bat script performs the following steps:The following instructions assume that you have either the Oracle sqlplus facility loaded on your system.
1. Ensure that the RDBMS environment variable is set appropriately. For example, ORACLE_HOME
2. Run setup_<rdbms type>.sh on UNIX or setup_<rdbms type>.bat on Windows.
Oracle Table Creation and Population
For example, with Oracle, run the setup_ora.sh
script with the following arguments:
setup_ora.sh <TNS name> <dbusername> <dbpassword>Sybase Table Creation and Populationsetup_ora.sh orcl iplanet iplanet
Where:
<TNS Name> is the Oracle service or TNS name which maps to the appropriate Oracle database instance. In the example above, orcl is the Oracle service or TNS name. (This assumes that the Oracle client has been configured to recognize orclas a valid Oracles service/TNS name.)
<dbusername> and <dbpassword> are the Oracle user name and password under which the tables will be created and populated. These are also the values that will be used by the sample application to access the Oracle database.
setup_syb.sh <Server Name(port:PORT)> <database> <dbusername> <dbpassword>Now your are ready to register the JDBC datasources for the application.setup_syb.sh SYBIAS(port:11920) db1 iplanet iplanet
Modify Sample Datasource XML Files
Modify the supplied datasource XML files to suit your driver and database
connection requirements. The logical driver name you assigned to your third
party driver in the driver registration instructions must be the same name
as set in the <DRIVER-TYPE>
tag of the datasource XML file. Although examples are provided for the
Oracle Type 4 JDBC driver, you should be able to use any of the supported
JDBC drivers listed in the iPlanet Application Server Service Pack 1 Release
Notes.
| Driver Type | Sample Datasource XML Files | What to Change? |
| iPlanet Type 2 JDBC Driver for Oracle |
|
|
| Oracle Type 4 JDBC Driver |
|
|
| PointBase Type 4 JDBC Driver |
|
|
The following is an example of the HelloDB datasource XML file as configured for an Oracle Type 4 JDBC driver. Note that the <database> and <datasource> tags are not required when registering datasources for third party JDBC drivers. Compare and contrast the Type 4 datasource examples with the iPlanet Type 2 datasource XML samples.
<ias-resource>And a Sybase jConnect example,
<resource>
<jndi-name>jdbc/hellodb/HelloDbDB/jndi-name>
<jdbc>
<driver-type>ora-type4</driver-type>
<database-url>jdbc:oracle:thin:@192.18.117.186:1521:orcl</database-url>
<username>iplanet</username>
<password>iplanet</password>
</jdbc>
</resource>
</ias-resource>
<ias-resource>And a PointBase example,
<resource>
<jndi-name>jdbc/hellodb/HelloDbDB</jndi-name>
<jdbc>
<driver-type>jconnect</driver-type>
<database-url>jdbc:sybase:Tds:192.138.151.39:4444</database-url>
<username>iplanet</username>
<password>iplanet</password>
</jdbc>
</resource>
</ias-resource>
<ias-resource>
<resource>
<jndi-name>jdbc/hellodb/HelloDbDB</jndi-name>
<jdbc>
<driver-type>PointBaseDriver</driver-type>
<database-url>jdbc:pointbase:hellodb,database.home=/usr/iplanet/ias6/pointbase/network/databases</database-url>
<username>iplanet</username>
<password>iplanet</password>
</jdbc>
</resource>
</ias-resource>
Register Datasource
After modifying the datasource XML files to suit your database connection
requirements, run the iasdeploy
command against the XML file to register the datasource in the application
server.
For example,
Go to the directory
install_dir/ias/ias-samples/database/hellodb/src/schema.
Execute the command
iasdeploy regdatasource hellodb-pointbase-type4.xml
The pre-built hellodb.ear file is a Enterprise ARchive file that contains the Web Archive (WAR) and EJB JAR files for the HelloDB application. Within each of these JAR files reside the XML deployment descriptor files, application class files, JSPs and other content required by the application.
Deploying the pre-built hellodb.ear file is simple.
1. Go to the root of the HelloDB sample directory:
install_dir/ias/ias-samples/database/hellodb/2. Execute iasdeploy to deploy application to the local application server instance:
iasdeploy deployapp hellodb.earRefer to the Getting Started section for more information on using the iasdeploy command.
The deployment process involves the following operations:
Otherwise, you're ready to exercise the application by Running the Application.
UNIX:install_dir/ias/bin/ksvradminWindows:Start->Programs->iPlanet Application Server->iAS Administration Tool
- Execute kregedit to start the application server's Registry Editor GUI.
- Navigate to the SOFTWARE/iPlanet/Application Server/6.0/ portion of the tree.
- Browse the J2EE-Application/ tree and look for the "hellodb" application.
- Expand the "hellodb" folder and explore this portion of the directory tree.
- Now open the J2EE-Module/ tree and look for the "hellodb" web application module entry and the "hellodbEjb" EJB module entry.
- Expand each of these folders and explore their contents.
- Once you find the GUID associated with each EJB in the HelloDB application, you can navigate through the SOFTWARE/iPlanet/Application Server/ClassDef/ folders to find out more details on each EJB. Expanding the matching GUID folders under the ClassDef folder will show you the detailed settings associated with each EJB. Many of these settings appear in the XML deployment descriptors for EJBs.
http://<web server hostname>:<port>/NASApp/hellodb/index.html
Enter your name and click submit. You should see a greeting message with your name displayed.
For example, to rebuild the entire application from scratch, follow these steps:
1. Compile and Assemble EJB JAR Components and Web Application
Execute "build" under hellodb/src/2. Redeploy ApplicationThe default target core will be executed to rebuild the EJB JAR and WAR files as well as the web application's EAR file.
Execute "build deploy" under hellodb/src/3. Restart Application Server
An application server restart will be necessary if you've modified either deployment descriptors or EJBs. For servlet and/or JSP modification, no restart is is necessary.To clean the web application project area, execute "build clean".
Copyright
(c) 2001 Sun Microsystems, Inc. All rights reserved.