 |
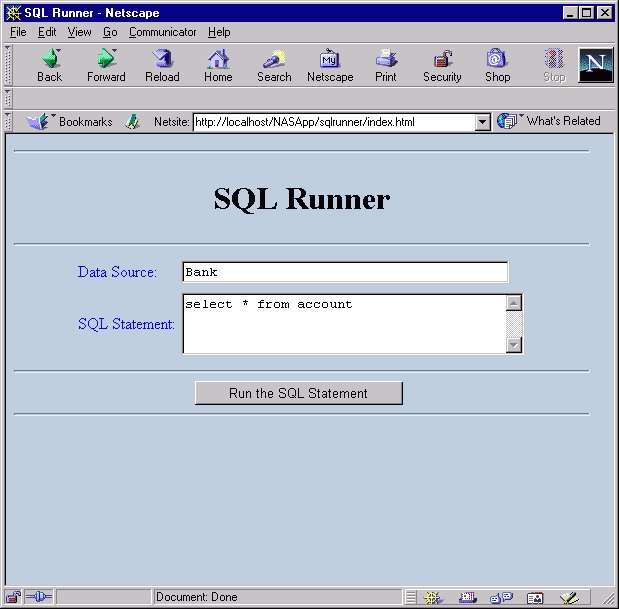
| Figure 1 - SQL Runner Input Form |
If you already went through the deployment process of SQL Runner you can run
the application by clicking here.
The first page of the SQL Runner application allows the user to enter
the database's Data Source name and the SQL statement in an HTML form,
as shown below:
|
| Figure 1 - SQL Runner Input Form |
When the user clicks the Run button, the SQL Statement is executed in
the specified Data Source, and the results are displayed as shown below:
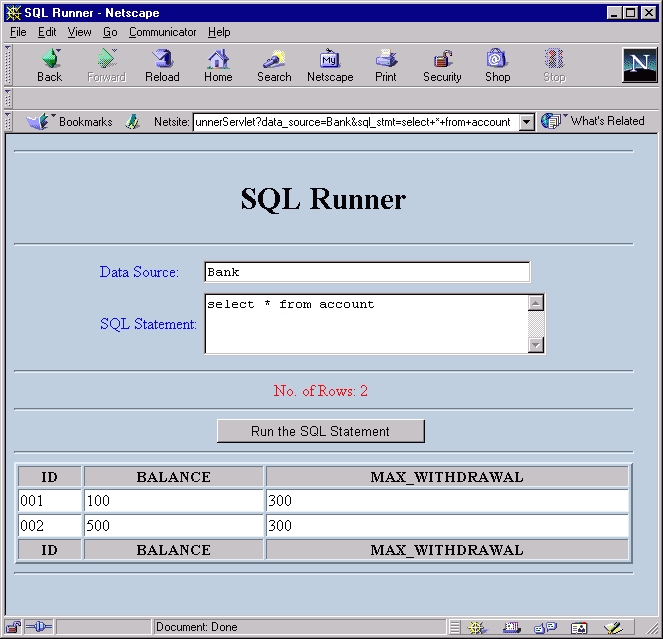 |
| Figure 2 - SQL Runner Results Page |
 |
| Figure 3 - SQL Runner Architecture and Process Flow |
Configuring the sample database involves the following steps:
The driver for the preinstalled PointBase database has already been registered and the data for all samples has been loaded into it during installation of the iPlanet Application Server . You do not need to install the driver separately. The logical name for this driver is "PointBaseDriver". If you intend to use PointBase to exercise this sample, then all you need to do is register the datasource.
You have the option of using either the iPlanet Type 2 JDBC driver or an external driver such as the Oracle Type 4 JDBC driver. A Type 4 driver is easier to configure in that it requires only a JAR file containing the RDBMS client classes. Type 2 drivers require native client libraries.
UNIX:
Execute the db_setup.sh script to register a third party JDBC driver.Windows:a) Enter the application server installation root directory:
Please enter the iAS installation root directory:b) Select option 2, Third Party JDBC Drivers
/usr/iplanet/ias6Do you want to use third party JDBC drivers or native drivers.c) Enter a logical name for the driver. This name will be supplied in the next step when configuring the JDBC datasource XML file.
1. iPlanet Type 2 Drivers
2. Third Party Drivers
To accept the default shown in brackets, press the Enter key.Select the component you want to install (1/2) [1]:
For example, for Oracle Type 4, the sample uses "ora-type4"d) Enter the driver class name.For example, for Sybase jConnect, the sample uses "jconnect".
For example, for Oracle, "oracle.jdbc.driver.OracleDriver"e) Enter the fully qualified path of the driver JAR or ZIP file.For example, for Sybase, "com.sybase.jdbc2.jdbc.SybDriver"
For example, forOracle, "<ORACLE_HOME>/jdbc/lib/classes12_01.zip"f) Enter the path for the driver's native libraries. Optional, applies to Type 2 drivers only.For example, for Sybase, "<jConnect install>/classes/jconn2.jar"
g) Restart the application server using the iascontrol kill and iascontrol start commands. Refer to the Getting Started section for more information. You must use the kill subcommand to ensure that the Java Engines (kjs') are completely stopped.
h) The next step is to identify an RDBMS user under which you will create and populate the application tables.
Execute the jdbcsetup.exe program to register a third party JDBC driver.a) Enter a logical name for the driver. This name will be supplied in the next step when configuring the JDBC datasource XML file.
For example, for Oracle Type 4, the sample uses "ora-type4"b) Enter the driver class name.For example, for Sybase jConnect, the sample uses "jconnect".
For example, for Oracle, "oracle.jdbc.driver.OracleDriver"c) Enter the fully qualified path of the driver JAR or ZIP file.For example, for Sybase, "com.sybase.jdbc2.jdbc.SybDriver"
For example, forOracle, "<ORACLE_HOME>/jdbc/lib/classes12_01.zip"d) Enter the path for the driver's native libraries. Optional, applies to Type 2 drivers only.For example, for Sybase, "<jConnect install>/classes/jconn2.jar"
e) Restart the application server using either the Application Server Administrative Tool or the iascontrol stop and iascontrol start commands. Refer to the Getting Started section for more information.
f) The next step is to identify an RDBMS user under which you will create and populate the application tables.
On UNIX, if during installation, either "Typical" or "Express" options were selected, JDBC database drivers will not be registered with the application server. If you are unsure as whether or not the client driver was registered, use the application server administrative tool to determine the drivers registered with the application server.
install_dir/ias/bin/ksvradmin
UNIX: Database Driver Registration
install_dir/ias/bin/db_setup.sh
Before you can create and populate the sample database, it is necessary to define the RDBMS user for the sample application. This RDBMS user will own the tables created for the sample application. The following example shows how to create a new user called sqlrunner using the Oracle SQL Plus utility.To define a new Oracle user:
1. Use SQL Plus and define the Oracle user name and password.Now that you've identified the user for the application tables, the next step is to create and populate the tables.SQL > create user sqlrunner identified by sqlrunner;
The first sqlrunner is the user name and the second sqlrunner is the password.
2. Grant connect, resource, and dba privileges to the sqlrunner Oracle user.
SQL> grant connect, resource, dba to sqlrunner;
If Pointbase is the target database, then nothing needs to be done since the database is prepopulated. However, if you do want to navigate the database tables or want to unload and create the tables from scratch (using the bank_pb.sql script in the schema directory), follow the instructions in the Using Pointbase with iPlanet guide.
A script named setup_ora.sh for Unix (setup_ora.bat for Windows) configures the Oracle database tables to be used by the sample application. The script does the following:
Go to the install_dir/ias/ias-samples/database/sqlrunner/src/schema
directory and find the setup_ora.sh script.
The following instructions assume that you have the Oracle sqlplus facility loaded on your system.
1. Ensure that the RDBMS environment variable is set appropriately. For example, ORACLE_HOME for Oracle.
2. Run setup_ora.sh on Unix or setup_ora.bat on Windows.
Oracle Table Creation and Population
For example, with Oracle, run the setup_ora.sh script as shown below:
Where:
<TNS Name> is the Oracle service or TNS name which maps to the appropriate Oracle database instance.
<username> and <password> are the Oracle username and password under which the tables will be created and populated. These are also the values that will be used by the sample application to access the Oracle database. These entries must be the same username and password that were created in the previous section, Create Sample Database User.
For example, to run the setup_ora.sh for TNS ias, username sqlrunner and password sqlrunner:
setup_ora.sh ias sqlrunner sqlrunner
Depending on the JDBC driver type you've selected to use, you'll modify a pair of pre-built datasource XML files and register these files through the iasdeploy CLI. Your modifications to the XML files will specify the database connection properties that are unique to your environment. Sample XML files are included for PointBase, Oracle and Sybase.Modify Sample Datasource XML Files
Modify the supplied datasource XML files to suit your driver and database connection requirements. The logical driver name you assigned to your third party driver in the driver registration instructions must be the same name as set in the <DRIVER-TYPE> tag of the datasource XML file. Although examples are provided for the Oracle Type 4 JDBC driver, you should be able to use any of the supported JDBC drivers listed in the iPlanet Application Server Service Pack 1 Release Notes.
Driver Type Sample Datasource XML Files What to Change? iPlanet Type 2 JDBC Driver for Oracle
- sqlrunner-ias-ora-type2.xml
- <datasource>
- <username>
- <password>
Oracle Type 4 JDBC Driver
- sqlrunner-ora-type4.xml
- <driver-type>
- <database-url>
- <username>
- <password>
PointBase Type 4 JDBC Driver
- sqlrunner-pointbase-type4.xml
- nothing !
The following is an example of the HelloDB datasource XML file as configured for an Oracle Type 4 JDBC driver. Note that the <database> and <datasource> tags are not required when registering datasources for third party JDBC drivers. Compare and contrast the Type 4 datasource examples with the iPlanet Type 2 datasource XML samples.
<ias-resource>And a Sybase jConnect example,
<resource>
<jndi-name>jdbc/sqlrunner/BankDB</jndi-name>
<jdbc>
<driver-type>ora-type4</driver-type>
<database-url>jdbc:oracle:thin:@localhost:1521:IAS</database-url>
<username>sqlrunner</username>
<password>sqlrunner</password>
</jdbc>
</resource>
</ias-resource><ias-resource>And a PointBase example,
<resource>
<jndi-name>jdbc/sqlrunner/BankDB</jndi-name>
<jdbc>
<driver-type>jconnect</driver-type>
<database-url>jdbc:sybase:Tds:192.138.151.39:4444</database-url>
<username>sqlrunner</username>
<password>sqlrunner</password>
</jdbc>
</resource>
</ias-resource><ias-resource>Register Datasource
<resource>
<jndi-name>jdbc/sqlrunner/BankDB</jndi-name>
<jdbc>
<driver-type>PointBaseDriver</driver-type>
<database-url>jdbc:pointbase://localhost/iassamples,max.connections=100</database-url>
<username>sqlrunner</username>
<password>sqlrunner</password>
</jdbc>
</resource>
</ias-resource>
After modifying the datasource XML files to suit your database connection requirements, run the iasdeploy command against the XML file to register the datasource in the application server.For example,
Go to the directory
install_dir/ias/ias-samples/database/sqlrunner/src/schema.
Execute the command
iasdeploy regdatasource sqlrunner-pointbase-type4.xml
Use the iascontrol stop and iascontrol start commands to restart the application server. Refer to the Getting Started section for more details.
You can verify if the Data Source was successfully registered by using the Application Server Admin Tool:1. Start the Application Server Admin ToolAlternatively, you can use the Registry Editor tool to verify Data Source registration:UNIX: install_dir/ias/bin/ksvradmin2. Connect to your application server instance by selecting File->New->Server. Click on Local Host to specify the default connection settings. Enter the application server administrator's password and click on OK.Windows: Start->Programs->iPlanet Application Server->iAS Administration Tool
3. Expand the server name (default name of iAS1) and select the Database button at the top of the window to see the Data Sources registered in this instance of the application server.
4. You should see a folder named External JDBC Datasources which contains the Data Source(s) that you just registered.
1. Start the Registry EditorUNIX: install_dir/ias/bin/kregedit2. Navigate to the SOFTWARE\iPlanet->Application Server->6.0->DataSource portion of the tree.Windows: Start->Programs->iPlanet Application Server->iAS Registry Editor
3. Browse the DataSource tree and look for the Data Source(s) that you just registered.
Command Line Interface (CLI)-based Deployment describes how to manually deploy the SQL Runner application in iPlanet using a Command Line Interface (CLI). This is the fastest means of deploying the SQL Runner application to the application server.Graphical User Interface (GUI)-based Deployment describes how to use the iPlanet Deployment Tool to deploy the SQL Runner application.
Deploying the pre-built sqlrunner.ear file is simple.
1. Go to the root of the SQL Runner sample directory:
install_dir/ias/ias-samples/database/sqlrunner2. Execute iasdeploy to deploy SQL Runner to the local application server instance:install_dir/ias/bin/iasdeploy deployapp sqlrunner.earThe deployment process involves the following operations:
If this is the first time that you deployed the SQL Runner application, there is no need to restart the application server. Otherwise, you will have to restart the application server using the iascontrol stop and iascontrol start commands. This will reload the application.iasdeploy authenticates against the local application server's administrative server. the EAR file is transferred to the administrative server. the administrative server begins the registration process: parses the EAR file and embedded WAR and EJB JAR files registers the J2EE application "sqlrunner" in the iPlanet Registry within the directory server registers the embedded J2EE modules (WARs and EJB JARs) in the iPlanet Registry within the directory server extracts the EJB JAR and WAR modules to the JAR/ directory. expands the content of the J2EE modules to the APPS/sqlrunner/ directory. Now that the SQL Runner application has been deployed, proceed to Verifying Application Registration.
Two approaches to using the Deployment Tool are described:
Import Pre-existing EAR File to quickly deploy the SQL Runner application. None of the application assembly steps are covered by this section. On average, this approach will take 15 minutes.or
Assemble Application from Scratch to learn how to use Deployment Tool to assemble and deploy the SQL Runner application from scratch. On average, this approach will take from 30 to 60 minutes.
1. Launch the Deployment Tool.
UNIX: Execute install_dir/ias/bin/deploytool2. Open the sqlrunner.ear fileWindows: Start->Programs->iPlanet Application Server 6.0->iAS Deployment Tool
3. Register EJB Resource Factories.
For a Data Source to be used in conjunction with the SQL Runner EJB, it needs
to be registered as a Resource Factory. This will make the Data Source available
to the SQL Runner application and will define a logical name (a.k.a. Resource
Name) for the Data Source. The logical name will be used when running the
SQL Runner application.
Resource Name |
Description |
Resource Class |
Authorization |
JNDI Name |
jdbc/Bank |
Bank Database |
javax.sql.DataSource |
Container |
jdbc/sqlrunner/BankDB |
Make sure you hit the Return or Enter key after each entry.If you wish to add other Data Sources, just do steps 4 and 5 again with the appropriate information.
When done, click on X in the upper right hand corner of the EJB Descriptor window in order to close it. Click on Yes when asked to save the changes.
Before you can use the Deployment Tool to assemble the application, you will have to compile the source code.
This will create the install_dir/ias/ias-samples/database/sqlrunner/build
directory which contains the compiled classes.
This section describes how to create the SQL Runner JAR file using the Deployment Tool's Graphical User Interface (GUI).
1. Create the assembly location.Create the directory install_dir/ias/ias-samples/database/sqlrunner/assemble outside the Deployment Tool. You will assemble the application into JAR files and save them to this directory.
2. Launch the Deployment Tool:
UNIX: Execute install_dir/ias/bin/deploytool3. Create sqlrunnerEjb.jar:Windows: Programs->iPlanet Application Server 6.0->iAS Deployment Tool
4. Insert all class files needed in the sqlrunnerEjb.jar file:
- In the startup dialog, select New EJB Application (.jar file). Alternatively, if Deployment Tool is already started, select File -> New from the menu bar.
- Click on EJB JAR Module.
- Set File Name to sqlrunnerEjb.jar
- Click on browse... to navigate to install_dir/ias/ias-samples/database/sqlrunner
- Select the assemble folder and click on Open to close the Browse window.
- Click on OK to close the New Application or module dialog box.
- The sqlrunnerEjb module appears in the EJB Modules window on the left side of the Deployment Tool.
- Click on Component View to see only the name of the EJB JAR module without the directory path.
5. Edit the Descriptor for the SQLRunnerEJB bean:
- Select sqlrunnerEjb from the EJB Modules window. Right click and select Insert (Alternatively, select the module, select Edit->Insert)
- Navigate to install_dir/ias/ias-samples/database/sqlrunner/build/classes/samples/database/sqlrunner/ejb.
- Select all classes and click on the right arrow (>). This will move the selected classes into the right side of the dialog window.
- Click on Resolve to determine if any of the included classes depend on other classes that have not been selected yet.
- Click on Insert to add the classes to the EJB JAR module.
- Since you selected Component View, you'll see the sqlrunnerEjb folder in the EJB Modules window. Expand the folder to see the SQLRunnerEJB bean. You can click on File View to see the complete list of files added to the module.
6. Register EJB Resource Factories.
- Select the SQLRunnerEJB bean in the EJB Modules window. Right click and select Edit Descriptor. This will display the EJB Descriptor:SQLRunnerEJB.class window on the right side of the Deployment Tool.
- Set the Bean Name to samples.database.sqlrunner.ejb.SQLRunnerEJB. We're giving it a fully qualified name to ensure uniqueness.
- Set the Remote Interface Class Name to samples.database.sqlrunner.ejb.SQLRunner.
- Set the Home Interface Class Name to samples.database.sqlrunner.ejb.SQLRunnerHome.
- Set the State Management Type to Stateless.
7. Save and close the sqlrunnerEjb JAR file.
- Select the References tab.
- Click on the Add button in the References to resource factories section.
- Enter the following information:
Resource Name Description Resource Class Authorization JNDI Name jdbc/Bank Bank Database javax.sql.DataSource Container jdbc/sqlrunner/BankDB Make sure you hit the Return or Enter key after each entry.
If you wish to add other Data Sources, just do steps 2 and 3 again with the appropriate information.
- Click on X in the upper right hand corner of the EJB Descriptor window in order to close it. Click on Yes when asked to save the changes.
- Select the sqlrunnerEjb folder from the EJB Modules window.
- Click on File->Close from the menu bar and click on Yes when asked to save the changes.
1. Create a new WAR file.
2. Add all class files needed to the sqlrunner WAR file.
3. Add all JSP and HTML files needed to the sqlrunner WAR file.
4. Define EJB References. This will establish the association between the
SQL Runner Servlet and the SQL Runner EJB
| Reference | Linked to Bean | Bean Type | Bean Home Interface | Bean Remote Interface |
| ejb/samples.database.sqlrunner.ejb.SQLRunner | samples.database.sqlrunner.ejb.SQLRunnerEJB | Session | samples.database.sqlrunner.ejb.SQLRunnerHome | samples.database.sqlrunner.ejb.SQLRunner |
Make sure you hit the Return or Enter key after each entry.
5. Save and close the sqlrunner WAR file.
1. Create a new EAR file:
2. Add the JAR and WAR files.
Next, we need to set the context root of the web application. This value
will appear in URLs that access web application components. For example,
in the URL http://localhost/NASApp/sqlrunner/index.html the sqlrunner
value is the context root of the web application.
4. Save the sqlrunner EAR file.
Note: You may authorize additional users to deploy applications to an application
server server by using the application server's Administrative Console. See
the Security settings tab in the Administrative Console.
1. Start the Application Server Admin Tool
To see more details associated with the application, you can use the Registry Editor tool:UNIX: install_dir/ias/bin/ksvradmin2. Connect to your application server instance by selecting File->New->Server. Click on Local Host to specify the default connection settings. Enter the application server administrator's password and click on OK.Windows: Start->Programs->iPlanet Application Server->iAS Administration Tool
3. Expand the server name (default name of iAS1) and select the Application button in the top right hand corner of the window to see the applications registered in this instance of the application server.
4.You should see several folders for the sqlrunner J2EE application. The sqlrunner entry with the world icon represents the web application module while the sqlrunnerEjb entry represents the EJB module packaged as part of the SQL Runner application.
Windows: Start->Programs->iPlanet Application Server->iAS Registry Editor
2. Navigate to the SOFTWARE\iPlanet->Application Server->6.0 portion
of the tree.
3. Browse the J2EE-Application tree and look for the sqlrunner application.
4. Expand the sqlrunner folder and explore this portion of the directory tree.
5. Browse the J2EE-Module tree and look for the sqlrunner web application module entry and the sqlrunnerEjb EJB module entry. Expand each of these folders and explore their contents.
6. Once you find the GUID associated with each EJB in the SQL Runner application, you can navigate through the SOFTWARE/iPlanet->Application Server->ClassDef folder to find out more details on each EJB. Expanding the matching GUID folders under the ClassDef folder will show you the detailed settings associated with each EJB. Many of these settings appear in the XML deployment descriptors for EJBs.
1. Start the application either by clicking here or, if you've deployed the web server on a separate machine, by accessing:
http://<web server hostname>:<port>/NASApp/sqlrunner/index.html
This will display the SQL Runner Input Form.2. Enter a value for Data Source. The entry should match one of the Resource Names that were defined in the section, Add JDBC Resource References, and it should be in any of the following formats:
- <Resource Name>
- jdbc/<Resource Name>
- java:comp/env/jdbc/<Resource Name>
To work with the pre-packaged datasource files bundled with the sample, use "bank" as the <Resource Name>
3. Enter a value for SQL Statement. The entry should be a valid SQL statement that is supported by the underlying database server and JDBC driver. Since "account" is the only table that ships with the SQL script that comes packaged with the sample, enter "select * from account" as the SQL statement.4. Click on Run the SQL Statement.
If the SQL Statement is a query, the results will be displayed in a form similar to Figure 2 in the Overview section. Otherwise, if the statement is an insert, update, or delete operation, the results will show the number of rows affected.
ERROR: Can't locate jdbc/<Resource Name>
Please make sure that the Data Source and SQL Statement are correct.
To correct this error, ensure that the Data Source entry matches the Resource Name in the EJB Resource Factories. Refer to the section, Register Datasources for details.
If the given SQL Statement is incorrect, the following error message will be displayed:
ERROR: ORA-00900: invalid SQL statement
Please make sure that the Data Source and SQL Statement are correct.
The error message that is displayed when there is an error in the SQL Statement may vary depending on the message that is received from the underlying database server. This example shows an error message received from an Oracle database server.
If you encounter problems when running the application, review the General Troubleshooting section to learn how to view logs files.
For example, to rebuild the entire application from scratch, follow these steps:
1. Compile and Assemble EJB JAR Components and Web ApplicationExecute build in the install_dir/ias/ias-samples/database/sqlrunner/src directory.
This will compile the source code and rebuild the EJB JAR, WAR and EAR files.
2. Redeploy Application
Execute build deploy in the install_dir/ias/ias-samples/database/sqlrunner/src directory.
3. Restart Application Server
An application server restart will be necessary if you've modified either deployment descriptors or EJBs. For servlet and/or JSP modification, no restart is is necessary.
To clean the web application project area, execute build clean
Copyright (c) 2001 Sun Microsystems, Inc. All rights reserved.