If you already went through the deployment process of HelloWorld you can run the application by clicking here.
The HelloWorld sample is a simple application based on HTML, Servlets, EJBs, and JSPs. Assembling this application and deploying it to iPlanet Application Server provides an introduction to the server's assembly, deployment and registration tools.
Let's assume that you want to create a small application to demonstrate web-based access to a stateless session bean via a servlet and JSP. The application look and feel is described below.
a. Bring up a web page with a form like this:

b. Enter your name and press the Process button
c. A servlet is invoked. The servlet will be the "controller" for the application.
d. The servlet calls a stateless session bean to determine a greeting based upon the current system time. This EJB fulfills the role of the "model" for our app.
e. The servlet dispatches a JSP to deliver the greeting back to the browser. The JSP servers as the "view" component of our application.
f. As a result of the JSP execution, you see the following page returned to your browser:

The terms "model," "view" and "controller" are used in the description above. If you have done Smalltalk programming, you may recognize the MVC (Model/View/Controller) design pattern. Each part of an MVC design has an independent role. The "model" is the business policy implemented by the application. For us here, it is the EJB that knows how to create appropriate greetings (the "Good afternoon" message would be "Good evening" instead if you ran the application after 6 PM, for example). The "view" is the component that handles the user interface display. That's our JSP. And finally, the "controller" is the traffic cop that provides a single control point from which worker components are dispatched.

Setting Up the Environment
Getting Started includes a checklist of prerequisites for deploying sample applications to iPlanet.
Deploying and Running the HelloWorld Application
Select one of two approaches to deploying the application:
Command Line-based Deployment describes how to manually register the HelloWorld application in iPlanet using a Command Line Interface (CLI). This is the fastest means of deploying HelloWorld to the application server.
GUI-based Deployment describes how to use the iPlanet Deployment Tool to import and deploy the HelloWorld application. It also addresses assembling the application from scratch using the Deployment Tool.
Running the Application describes how to start the application, navigate through it and how to troubleshoot in the event of problems.
Compiling and Assembling the Application describes how to use command line tools to recompile the sources and rebuild the WAR and EJB modules and the overall EAR file.
The pre-built helloworld.ear file is a Enterprise ARchive file that contains the Web Archive (WAR) and EJB JAR files for the HelloWorld application. Within each of these JAR files reside the XML deployment descriptor files, application class files, JSPs and other content required by the application.
Deploying the pre-built helloworld.ear file is simple.
1. Go to the root of the HelloWorld sample directory:
install_dir/ias/ias-samples/helloworld/
2. Execute iasdeploy to deploy application to the local application server instance:
iasdeploy deployapp helloworld.ear
Refer to the Getting Started section for more information on using the iasdeploy command.
The deployment process involves the following operations:
If you would like to verify the registration of the application, proceed to Verifying Registration.
Otherwise, you're ready to exercise the application by Running
the Application.
Two approaches to using the Deployment Tool are described:
Import Pre-existing EAR File to quickly deploy the HelloWorld application to iPlanet using the Deployment Tool. None of the application assembly steps are covered by this section. On average, this approach will take 10 minutes.or
Assemble the Application to learn how to use Deployment Tool to assemble the application from scratch and to deploy it to the application server. On average, this approach will take from 30 to 60 minutes.
Open the pre-existing HelloWorld EAR file.
UNIX:Execute install_dir/ias/bin/deploytoolWindows:Start->Programs->iPlanet Application Server 6.0->iAS Deployment Tool
To compile the application sources, simply execute "build compile" under the application's src/ directory. See the section Compiling and Assembling the Application for more information on recompiling the application using the supplied build facility.
Create the new directory install_dir\ias\ias-samples\helloworld\assemble\ outside the Deployment Tool. You will assemble the application into JAR files and save them to this directory.2. Launch the Deployment Tool:
UNIX: Execute install_dir/ias/bin/deploytool&3. Create helloworldEjb.jar:Windows: Programs->iPlanet Application Server 6.0->iAS Deployment Tool
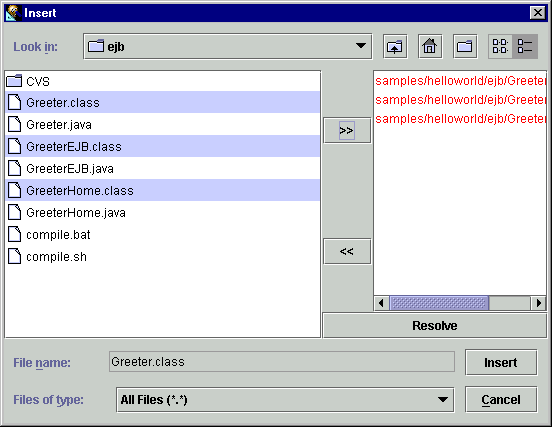
ias-samples\helloworld\build\classes\samples\helloworld\ejb\

1. Modify Descriptor for Greeter EJB
2. Begin Modifying the Greeter EJB Descriptor
3. Close the Descriptor for the EJB
Now we can close the EJB descriptor by clicking on the X in the upper right hand corner of the descriptor window. Click on Yes when asked to save the changes.
Now that we've assembled the EJB JAR module, we're ready to move on to assembling the Web Application aRchive (WAR) file.
1. Create helloworld.war:

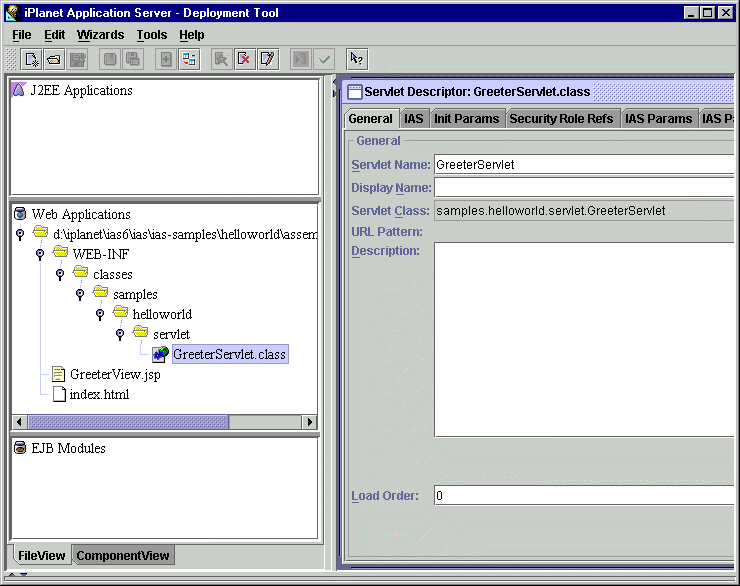
2. Now insert all class files needed in the helloworld.war file:
ias-samples\helloworld\build\classes\samples\helloworld\servlet\
3. Add JSP and HTML files needed to the .war file

Now we need to make several changes to settings at the WAR module level. To do so, select either the WAR file path if in File View or the WAR module name if in Component View. Right click and select Edit Descriptor.
As described for the helloworldEjb.jar, in the following paragraphs, the title gives the tab name, where you have to enter the data given below.
References Tab
EJB References:
Reference Bean Type Linked to Bean Bean Home Interface Bean Remote Interface ejb/greeter Session TheGreeter samples.helloworld.ejb.GreeterHome samples.helloworld.ejb.Greeter
Now that we've assembled both J2EE modules (EJB JAR and WAR), we're ready to move on to assembling the modules into an EAR file.
1. Create helloworld.ear:
2. Add helloworldEjb.jar and helloworld.war Files:
3. Set Context Root for Web Application
Next, we need to set the context root of the web application. This value will appear in URLs that access web application components. For example, in the URL http://localhost/NASApp/helloworld/GreeterServlet the "helloworld" value is the context root of the web application.
4. Save helloworld.ear:
Now that the EAR file has been assembled, the next step is to deploy the application to an application server instance.
If you followed the assembly instructions, then helloworld.ear is opened in Deployment Tool. If you opened the pre-existing EAR file, you are working with install_dir\ias\ias-samples\helloworld\helloworld.ear. If you are following the "Create EAR File from Scratch" instructions, you are modifying install_dir\ias\ias-sample\helloworld\assemble\helloworld.ear.
If you entered all deployment information manually, you can skip the following steps 1 to 3, because you have entered this information already.
1. Select the helloworld.ear file under the J2EE Application window.
2. Select File -> Deploy
3. If you have not already registered a target application server, do so now by clicking on the Register button. Enter the host name, administrative port number and username/password for the target application server. Otherwise, select a pre-registered target server.
Note: You may authorize additional users to deploy applications to an application server by using the application server's Administrative Console. See the Security settings tab in the Administrative Console.
5. If you deployed helloworld.ear previously, then select Overwrite Modules.
4. Click on Deploy to start the deployment process.
6. Now the file transfer and application registration begins. See the Deploy tab for the status of the deployment. The deployment may take several minutes to complete.
UNIX:install_dir/ias/bin/ksvradminWindows:Start->Programs->iPlanet Application Server->iAS Administration Tool
- Execute kregedit to start the application server's Registry Editor GUI.
- Navigate to the SOFTWARE/iPlanet/Application Server/6.0/ portion of the tree.
- Browse the J2EE-Application/ tree and look for the "helloworld" application.
- Expand the "helloworld" folder and explore this portion of the directory tree.
- Now open the J2EE-Module/ tree and look for the "helloworld" web application module entry and the "helloworldEjb" EJB module entry.
- Expand each of these folders and explore their contents.
- Once you find the GUID associated with each EJB in the HelloWorld application, you can navigate through the SOFTWARE/iPlanet/Application Server/ClassDef/ folders to find out more details on each EJB. Expanding the matching GUID folders under the ClassDef folder will show you the detailed settings associated with each EJB. Many of these settings appear in the XML deployment descriptors for EJBs.
Then start the application by accessing the URL:
http://<web server hostname>:<port>/NASApp/helloworld/index.html
Enter your name and click submit. You should see a greeting message with your name displayed.
If you encounter problems when running the application, review the General Troubleshooting section to learn how to view logs files.
To easily recompile, assemble and deploy the application, see the Sample Application Build Facility document for details on using a build facility to quickly perform these tasks.
For example, to rebuild the entire application from scratch, follow these steps:
1. Compile and Assemble EJB JAR Components and Web Application
Execute "build" under helloworld/src/
The default target core will be executed to rebuild the EJB JAR and WAR files as well as the web application's EAR file.
2. Redeploy Application
Execute "build deploy" under helloworld/src/
3. Restart Application Server
An application server restart will be necessary if you've modified either deployment descriptors or EJBs. For servlet and/or JSP modification, no restart is is necessary.
To clean the web application project area, execute "build clean".
Copyright
(c) 2001 Sun Microsystems, Inc. All rights reserved.