Restaurant Reservation System (RRS) Application
iPlanetTM
Application Server Samples
Updated June 12, 2001
The Restaurant Reservation System (RRS) sample application provides a web-based
interface to a basic online restaurant reservation service. A collection of
servlets and JSP provide customers with restaurant search and reservation services.
The restaurant owners are able to check reservations in database and observe
customer information.
The RRS application is designed to support multiple languages and demonstrates
internationalization features in iPlanet Application Server. iPlanet Application
Server provides more than thirty international APIs to aid in the development
of global application. By using these APIs, the RRS application determines which
localized page should be displayed for each client according to acceptable language
of the browser. Currently, it supports only English and Japanese, but it can
be extensible for most of the popular locales.
Setting Up the Environment
Getting Started includes a
checklist of prerequisites for deploying sample applications to iPlanet.
Configuring the Database describes how to setup the
database schema, load the content and register the JDBC data sources for the
RRS application.
Deploying and Running the Application
Select one of two approaches to deploying the application:
Command Line-based Deployment describes how to
manually register the application in iPlanet using a Command Line Interface
(CLI). This is the fastest means of deploying the application.
GUI-based Deployment describes how to use the
iPlanet Deployment Tool to import and deploy the application. It also addresses
assembling the application from scratch using the Deployment Tool.
Running the Application describes how to start the application,
navigate through it and how to troubleshoot in the event of problems.
Further Exploration
Compiling and Assembling the Application describes
how to use command line tools to recompile the sources and rebuild the WAR
and EAR files.
Setting Bitstream Cyberbit font describes how to download
and install Bitstream Cyberbit font to display Japanese pages with Netscape
Navigator4.x on Win9x/NT.
Configuring the Database
The RRS sample application requires the following database setup prior
to running the application:
Ensure Database Requirements are Met
Ensure Database Driver is Registered
Identify or Create a Database User
Create and Populate Sample Database Tables
Ensure Database Requirements are Met
See the iPlanet Application Server Release Notes for database version requirements.
Database population and setup scripts are provided for Oracle server. Other
databases supported by iAS should work in conjunction with RRS, but iPlanet
has not tested these combinations.
Note: This sample does not support PointBase.
Ensure Database Driver is Registered
This section describes how to register an underlying database driver with the
application server in the event that a driver was not registered during installation
of the application server. The following instructions address only the registration
of the database client driver. The subsequent section of this document will describe
how to populate the database tables and register JDBC data sources.
Determine if the iPlanet Type 2 Driver is Registered
On UNIX, if during installation the application server, either "Typical" or "Express"
installation options were selected, the native database driver will not be registered
in the application server. If you are unsure as whether or not the client driver
was registered, use the application server's Administrative Tool to determine
status of JDBC drivers.
- Start the Admin Tool
<application
server install path>/ias/bin/ksvradmin
- Connect to your application server instance by selecting File->New->Server.
Click on Localhost
to specify the default connection settings. Enter the application server's
administrator's password and click on OK.
- Click on the Database
button and expand the server name (default name of iAS1)
to see the database driver settings.
- If you see a red X on the client driver entry of interest, then you need
to run the db_setup.sh
script to register the native client driver in the application server. Go
to the next section to register the driver.
On Windows, the application server automatically detects whether or not drivers
for any of the supported databases are available. If a driver is present, the
driver will be automatically registered during installation of the application
server.
Register Driver if Necessary
For UNIX, if the driver has not been registered (you see the red X in the Admin
Tool), then you must use the db_setup.sh
command to register the driver with the application server.
UNIX: Database Driver Registration
- Ensure that your user ID is the same as the one used to install the application
server.
- Execute the database driver registration script:
<application
server install path>/ias/bin/db_setup.sh
- Follow the instructions to register the native client driver. The default
application server installation root directory is /usr/iplanet/ias6.
- For this sample, you need not register a Resource Manager. (Resource Manager
setup is required only in support of distributed and possibly heterogeneous
transactions relying on the application server's built-in transaction manager).
- Restart the application server using the iascontrol
stop and iascontrol
start commands.
- After you've registered the driver, you can use the application server's
Admin Tool (ksvradmin)
to verify that the native driver entry no longer shows a red X and that the
client library and other settings are accurate.
Identify or Create an RDBMS User
You should ensure that you have an RDBMS user defined for the sample application.
You can use either an existing RDBMS user or define a new RDBMS user for the sample
application. This RDBMS user will own the tables created for the sample application.
The following example shows how to create a new user called rrs
using the Oracle SQL Plus utility. It is strongly recommended that a user such
as rrs be
used to create the sample database tables. This approach will help to avoid confusion
between table names used in other applications.
To define a new Oracle user:
- Use SQL Plus to define an Oracle user name (e.g. rrs).
SQL > create user rrs
identified by rrs;
Where the first rrs
is the user name and the second rrs
is the password.
- Grant connect, resource, and dba privileges to the rrs
Oracle user.
SQL> grant connect,
resource, dba to rrs identified by rrs;
Create and Populate the Sample RDBMS Tables
A shell script named setup_<rdbms
type>.sh/.bat configures the database tables, populates the
tables with sample data and updates the application server's registry with database
information to support the RRS sample application. The setup_<rdbms
type>.sh/.bat script performs the following steps:
- Dynamically creates an XML file describing the JDBC datasource.
- Invokes the application server's iasdeploy
regdatasource command to register the data source resource
in the application server's registry.
- Verifies connectivity to the specified database.
- Creates the tables required by the RRS application and populates the tables.
Go to the <application
server install path>/ias/ias-samples/l10n/rrs/src/schema/ directory
and find the setup_<rdbms
type>.sh/.bat file that corresponds to the database of interest.
Now follow these instructions:
UNIX: Create and Populate RDBMS
Windows: Create and Populate RDBMS
UNIX: Create and Populate RDBMS
- Ensure that the RDBMS enviornment variable is set appropriately. For example,
ORACLE_HOME or SYBASE.
- Edit setup_<rdbms
type>.sh. Set the GX_ROOTDIR
environment variable to the location of the ias/
directory in your application server installation.
For example,
GX_ROOTDIR=/usr/iplanet/ias6/ias
3. Run setup_<dbname>.sh
with the following arguments:
setup_ora.sh
<TNS name> <dbusername> <dbpassword>
For example using Oracle:
setup_ora.sh
iassample rrs rrs
Where:
<TNS Name>
is the Oracle service or TNS name which maps to the appropriate Oracle database
instance. In the example above, "iassample" is the Oracle service or TNS
name. (This assumes that the Oracle client has been configured to recognize
"iassample" as a valid Oracles service/TNS name.)
<dbusername>
and <dbpassword>
are the Oracle user name and password under which the tables will be created
and populated. These are also the values that will be used by the sample
application to access the Oracle database.
Since the setup_ora.sh
script uses sqlplus, ensure that LD_LIBRARY_PATH
includes $ORACLE_HOME/lib.
Windows: Create and Populate RDBMS
1. Ensure that the RDBMS enviornment variable is set appropriately. For example,
ORACLE_HOME or SYBASE.
2. Run setup_<rdbms
type>.bat with the following arguments:
setup_ora
<TNS name> <dbusername> <dbpassword>
For example using Oracle:
setup_ora
iassample rrs rrs
Where:
<TNS Name>
is the Oracle service or TNS name which maps to the appropriate Oracle database
instance. In the example above, "iassample" is the Oracle service or TNS name.
(This assumes that the Oracle client has been configured to recognize "iassample"
as a valid Oracles service/TNS name.)
<dbusername>
and <dbpassword>
are the Oracle user name and password under which the tables will be created
and populated. These are also the values that will be used by the sample application
to access the Oracle database.
Command Line-based Deployment
You have a choice of deploying and registering the application through either
command line utilities or the iPlanet Application Server Deployment Tool GUI.
Since a complete EAR file is supplied, the fastest means of setting up the application
is to use the command line utilities as described in this section. If you would
like to experience either deploying through a GUI tool or assembling an application
from scratch, then follow instructions in GUI-based Deployment.
The pre-built rrs.ear
file is a Enterprise ARchive file that contains the Web Archive
(WAR) file of the RRS application. Within the WAR file resides the XML deployment
descriptor files, application class files, JSPs and other content required by
the application.
Deploying the pre-built rrs.ear
file is simple.
1. Go to the root of the sample directory:
install_dir/ias/ias-samples/l10n/rrs/
2. Execute iasdeploy
to deploy application to the local application server instance:
iasdeploy
deployapp rrs.ear
Refer to the Getting Started
section for more information on using the iasdeploy
command.
The deployment process involves the following operations:
- iasdeploy authenticates against the local application server's administrative
server.
- the EAR file is transferred to the administrative server.
- the administrative server begins the registration process:
- parses the EAR file and embedded WAR file
- registers the J2EE application "rrs" in the iPlanet Registry within
the directory server
- registers the embedded J2EE WAR module in the iPlanet Registry within
the directory server
- extracts the WAR module to the JAR/
directory.
- expands the content of the J2EE WAR module to the APPS/rrs/
directory.
If you would like to verify the registration of the application, proceed to
Verifying Registration.
Otherwise, you're ready to exercise the application by Running
the Application.
GUI-Based Deployment
The Deployment Tool provides an easy-to-use means of assembling J2EE applications
and deploying applications to iPlanet Application Server. For most cases, use
of Deployment Tool is recommended over the approach of manually creating XML-based
deployment descriptors and manually assembling J2EE modules and application
JAR files.
Two approaches to using the Deployment Tool are described:
Import Pre-existing EAR File to quickly deploy
the application to iPlanet using the Deployment Tool. None of the application
assembly steps are covered by this section. On average, this approach will
take 5-10 minutes.
or
Assemble the Application to learn how to use Deployment
Tool to assemble the application from scratch and to deploy it to the application
server. On average, this approach will take from 15-30 minutes.
Import Pre-existing EAR File
Since a pre-built Enterprise ARchive (EAR) file for the RRS application is included
with the application server, you can use the Deployment Tool to quickly read in
the .ear file and deploy it to the application server.
Open the pre-existing RRS EAR file.
- Launch the Deployment Tool.
UNIX:
Execute <iAS install path>/ias/bin/deploytool
Windows:
Start->Programs->iPlanet Application Server 6.0->iAS Deployment
Tool
- Open the rrs.ear file
- In the startup dialog, select "Browse for more applications" to find the
rrs.ear file.
- Navigate to ias/ias-samples/l10n/rrs/
and open the rrs.ear
file.
- Click on the file name to expand the EAR file.
- Proceed to Deploying the Application
Assemble the Application
This approach involves assembling the RRS application from scratch. After compiling
the Java sources, you will start Deployment Tool and create the application WAR
and EAR files. Then you will deploy the application to the application server.
- Compile Application Sources
- Assemble WAR Module
- Assemble EAR
- Verifying the Application
- Deploy Application
- Verifying Registration
Compile Application Sources
To compile the application sources, simply execute "build
compile" under the application's src/
directory. See the section Compiling and Assembling the Application
for more information on recompiling the application using the supplied build
facility.
Assemble WAR Module
1. Create assembly location:
Create the new directory <application
server install path>\ias\ias-samples\l10n\rrs\assemble\ outside
the Deployment Tool. You will assemble the application into archive files and
save them to this directory.
2. Launch the Deployment Tool:
Start->Programs->iPlanet Application Server 6.0->iAS Deployment Tool
3. Create rrs.war
- In the welcome dialog, select the Create a New Application radio
button and click OK
- Alternatively, if Deployment Tool is already started, select File ->
New...
- Make the following selections in the New Application or Module dialog
box:
- Select the Web Application (.war) radio box in the Application
Type panel
- Use the filename rrs.war
- To select the destination directory, left-click the Browse...
button and choose the directory <application
server install path>\ias\ias-samples\l10n\rrs\assemble
- Click OK
4. Add the servlet class, JSP and image files to the .war file
- First, add the servlet class files to the WAR file.
- Select the rrs.war node in the the Web Applications treeview and choose
Edit > Insert Files.
- The Insert dialog opens.
- Navigate to the <sample extract root>/ias/ias-samples/l10n/rrs/src/samples/rrs/servlets/
directory.
- Use the SHIFT or CTRL key to select all .class files in the directory.
- Click ">>" button to select the files to be inserted.
- The files display in red in the right box.
- Navigate to the <sample extract root>/ias/ias-samples/l10n/rrs/src/samples/rrs/util/
directory and select all .class files to be inserted.
- Navigate to the <sample extract root>/ias/ias-samples/l10n/rrs/src/samples/rrs/database/
directory and select all .class files to be inserted.
- Click Resolve and the Deployment Tool verifies that any classes that
are referenced in the servlet are also included.
- The files now display in blue to indicate that all class dependencies
have been resolved.
- Click Insert and .class files are added to the the rrs.war archive.
- Next, add the JSP and image files to the WAR file.
- Select the rrs.war node in the the Web Applications treeview and choose
Edit > Insert Files.
- The Insert dialog opens.
- Navigate to the <sample extract root>/ias/ias-samples/l10n/rrs/src/docroot/
directory.
- Use the SHIFT key to select all .jsp files.
- Click ">>" button to select the files to be inserted.
- The files display in red in the right box.
- Click Resolve and the Update Dest. Paths dialog opens for you to
specify the destination path of these files within the archive.
-The update destination path is relative to the root of the archive.
- Select all files shown in red and the path displays in the Update
Dest. Path box below.
- Clear the Update Dest.Path box or enter "\" to ensure that all
files will appear at the root of the archive.
- Click Update and and click OK to close the Update Dest. Paths dialog.
- The files now appear in blue to indicate that the destination path
has been specified.
- Click Insert and the files are added at the root of the rrs.war
archive.
- Select the rrs.war node in the the Web Applications treeview and choose
Edit > Insert Files.
- The Insert dialog opens.
- Navigate to the <sample extract root>/ias/ias-samples/l10n/rrs/src/docroot/image/
directory.
- Use the SHIFT key to select all .jpg and .gif files.
- Click ">>" button to select the files to be inserted.
- The files display in red in the right box.
- Click Resolve and the Update Dest. Paths dialog opens for you to
specify the destination path of these files within the archive.
-The update destination path is relative to the root of the archive.
- Select all files shown in red and the path displays in the Update
Dest. Path box below.
- Enter "\image\" in the Update Dest. Path box.
- Click Update and and click OK to close the Update Dest. Paths dialog.
- The files now appear in blue to indicate that the destination path
has been specified.
- Click Insert and the files are added at the /image directory of
the rrs.war archive.
5. Edit Descriptor
Now that you've assembled the WAR module, you are ready to create the Enterprise
ARchive (EAR) file.
Assemble EAR
1. Create rrs.ear:
- In the Deployment Tool choose File > New.
- Select Application Type: J2EE Application.
- Enter the FileName: rrs.ear.
- Click Browse and navigate to <sample extract root>/ias/ias-samples/l10n/rrs/assemble/
so that "assemble" appears in the File name box.
- Click Open and then click OK.
- The J2EE Applications treeview (with FileView tab selected), shows the absolute
path to the rrs.ear file.
2. Include rrs.war:
- Drag and drop the rrs.war file from the Web Applications treeview on the
rrs.ear file in the J2EE Applications treeview.
- Note that to add modules using drag and drop you must have FileView selected.
Otherwise, you can add them via the Insert dialog.
3. Delete the default deployment descriptor for JSP component.
- Right-click AdminPage.jsp file in the J2EE Applications treeview and choose
Delete Descriptor.
- Click "YES" to confirm deletion.
- Repeat the above procedure for all JSP files in the J2EE Applications
treeview.
4. Choose File > Save.
Verifying the Application
Before deploying applications/modules you should confirm that the RRS J2EE application
and components conform to the Java 2 Enterprise Edition Specification.
To verify the application
- Select the rrs.ear file and choose File > Verify.
- The Verifier checks references to Roles and Resources (in the source code
of the J2EE components) have been linked properly in the DD editor.
Deploy the Application
You will now deploy the EAR file to a target iPlanet Application Server. During
deployment the .ear file is copied to one or more target iPlanet Application Server(s).
After the EAR file is deployed to the server, registration occurs. After deployment
completes, you will be able to run the application. No server restart is required.
To deploy the application
1. Select the rrs.ear file and choose File > Deploy.
2. If you are using the Deployment Tool for the first time, click Register and
complete steps 4 through 6. Otherwise continue with step 7.
3. Enter Host name (machine name) of an application server instance.
4. Enter a port number that represents the application server administrative
server (this port defaults to 10817).
5. Enter the application server administrator's user name and password chosen
during installation.
6. Click Okay.
7. Select the application server instance in the Register Servers box and click
Deploy.
8. Click the Deploy tab to verify the status of the deployment.
- The application has now been successfully deployed on your target server in
the install_dir/ias/Apps/rrs
directory.
9. Exit the Deployment Tool File > Exit.
Verifying Registration
As an optional step, you can use the iPlanet Application Server Administration
Tool to verify that the application has been registered. If you do not want to
verify that the application has been registered, proceed directly to Running
the Application.
- Start the application server's Admin Tool
UNIX:
<application
server install path>/ias/bin/ksvradmin
Windows:
Start->Programs->iPlanet
Application Server->iAS
Administration Tool
- Connect to your application server instance by selecting File->New->Server.
Click on Localhost
to specify the default connection settings. Enter the application server administrator's
password and click on OK.
- Select the server name (default name of iAS1)
and select the Application button in the top right hand corner of the window
to see the applications registered in this instance of the application server.
- You should see several folders for the "rrs" J2EE application. The "rrs"
folder with the world icon represents the web application module.
To see more details associated with the application, you can browse the iPlanet
Application Server Registry using a tool named kregedit:
- Execute kregedit
to start the application server's Registry Editor GUI.
- Navigate to the SOFTWARE/iPlanet/Application
Server/6.0/ portion of the tree.
- Browse the J2EE-Application/
tree and look for the "rrs" application.
- Expand the "rrs" folder and explore this portion of the directory tree.
- Now open the J2EE-Module/
tree and look for the "rrs" web application module entry.
- Expand each of these folders and explore their contents.
- Once you find the GUID associated with servlet in the RRS application,
you can navigate through the SOFTWARE/iPlanet/Application
Server/ClassDef/ folders to find out more details on the servlet.
Expanding the matching GUID folder under the ClassDef
folder will show you the detailed settings associated with the servlet.
Running the Application
Set Specific Language Support (UNIX Only)
On UNIX only, prior to running the application, add the following 2 lines to
install_dir/ias/bin/kjs
script:
NLS_LANG=Japanese_Japan.JA16SJIS
export NLS_LANG
Then restart the application server using iascontrol
stop followed by iascontrol
start.
Configure International Mode in Application Server
In the application server's Administrative Tool, enable International mode.
Restart the application server using iascontrol
stop followed by iascontrol
start.
Run the Application
Start the application by going to:
http://<hostname>/NASApp/rrs/ShowIndexServlet
List of Customers in Database
|
name
|
password
|
locale/country
|
|
Bob Smith
|
bob
|
en_US/U.S.A
|
|
ÄRōcæ¾śY
|
taro
|
ja_JP/ōú¢{
|
|
Scott Tiger
|
scott
|
en_US/U.S.A
|
List of Restaurants in Database
|
ID
|
name
|
localized name
|
cuisine
|
price range
|
|
1
|
Shogun Sushi
|
Å«īRÄõÄi
|
Japanese
|
$20 - $40
|
|
2
|
Washington Diner
|
āÅāVāōāgāōā_āCāiü[
|
American
|
more than $40
|
|
3
|
Cafe Berkeley
|
āJātāF āoü[āNāīü[
|
California
|
$10 - $20
|
|
4
|
Rome
|
āŹü[ā}
|
Italian
|
more than $40
|
|
5
|
Bangkok
|
āoāōāRāN
|
Thai
|
$20 - $40
|
|
6
|
Paris
|
-
|
French
|
$10 - $20
|
|
7
|
Alegrias
|
-
|
Spanish
|
more than $40
|
|
8
|
HongKong Restaurant
|
-
|
Seafood
|
$20 - $40
|
|
9
|
Hanoi
|
-
|
Vietnamese
|
less than $10
|
|
10
|
Best One
|
-
|
Others
|
more than $40
|
|
101
|
Golden Gate
|
āSü[āŗāfāōāQü[āg
|
California
|
$10 - $20
|
Administrator Password
You will be required the password to login as the administrator. The password
is "admin".
Troubleshooting
If you encounter problems when running the application, review the General
Troubleshooting section to learn how to view logs files.
If you encounter squares in place of text in the browser, then see the Setting
Bitstream Cyberbit Font section for details on how to correct this problem.
Compiling and Assembling the Application
To easily recompile, assemble and deploy the application, see the Sample
Application Build Facility document for details on using a build facility
to quickly perform these tasks.
To rebuild the entire sample from scratch, you can simply execute:
build all
From the directory install_dir/ias/ias-samples/l10n/rrs/src/
On UNIX, you might need to modify your PATH to ensure that install_dir/ias/bin
is included to pickup the build
script.
Setting Bitstream Cyberbit Font
If you are using Netscape navigator 4.X on WinNT as browser, you may get boxes
instead of Japanese string when you try to display Japanese pages (see Fig.1).
In this case, you will need to install an Unicode font or a Japanese font to your
system. This section describes how to download and install Bitstream Cyberbit
font for a Netscape navigator.
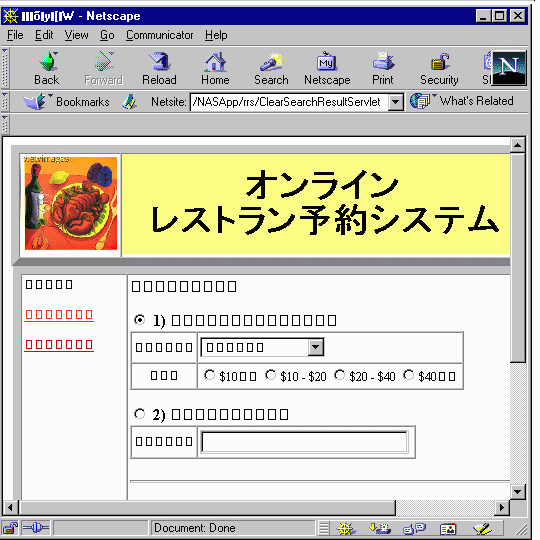
Fig.1
1. Download and install Bitstream Cyberbit font.
- Download Bitstream Cyberbit font from http://jefferson.village.virginia.edu/babble/download/cyberbit.html
- Download "original.zip" to temporary directory.
- Use a utility such as WinZip to decompress the zip file.
- Install Bitstream Cyberbit font at font control panel.
- Double click "my computer" > Double click "control panel" > Double
click "fonts control panel".
- Pull down "File" > Choose "install new font" and select the temporary
directory and font file to install.
2. Setup for Netscape navigator.
At Netscape navigator,
- Menu > "Edit (E)" > "Preference (E)"
- Click "Appearance" > "Fonts"
- Select "Japanese" for "language for Encoding.
- Select "Bitstream Cyberbit" for variable and fixed width fonts.
Copyright (c)
2001 Sun Microsystems, Inc. Some preexisting portions; Copyright (c) 2001 Netscape
Communications Corp. All rights reserved.