The SOAP Helloworld sample demonstrates how SOAP can be used to access an EJB on the iPlanet Application Server. The following instructions describes how to assemble and deploy the application.
Application Overview
Note: This sample requires that the HelloWorld sample be deployed and exercised prior to running the SOAP interface to the HelloWorld EJB.
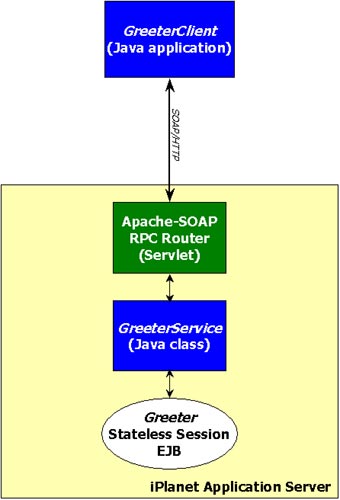
A simple command line based Java client uses SOAP RPC over HTTP to access a SOAP service which in turn calls a stateless session bean. This sample should provide a developer with a basic understanding of using SOAP to call EJB components in iPlanet Application Server.
The core part of the application is the GreeterService. This is a SOAP proxy to the HelloWorld stateless EJB and is a simple class that wraps the helloworld EJB business methods. It is registered as a SOAP service. Any client that implements SOAP can call methods on this service.
 public class GreeterSoapService {

    ...

    public String getGreeting() {

       // do JNDI lookup and call ejb home create to create ejb

       ...

       String msg = helloWorldEJB.getGreeting();

       ...// release ejb instance

       return MSG;

    }

 }
As seen above, the method implementation in the proxy service delegates processing
to the backend EJB. When a client calls a method on SOAP service, it in turn calls
the corresponding method on the EJB.
The GreeterClient, as shown in the diagram below, is simple Java application that acts as a SOAP client. It uses the Apache SOAP RPC router to call the SOAP service. It simply calls a method on the SOAP service and prints the result on console. Although this client is implemented in Java, it can be developed in any language for which a SOAP implementation is available.
Setting Up the Environment
Getting Started includes a checklist of prerequisites for deploying sample applications to iPlanet.Deploying and Running the ApplicationInstalling Apache SOAP framework in the application server. This must be done before the HelloWorld SOAP sample is exercised.
Installing Helloworld sample application. This must be done before the HelloWorld sample is exercised.
Deploying the Sample describes how to manually register the application in iPlanet using a Command Line Interface (CLI).Further ExplorationRunning the Application describes how to start the application, navigate through it and how to troubleshoot in the event of problems.
Web-based Registration of SOAP Service describes how to use the Apache SOAP administrative web interface to register the sample SOAP service.
Compiling and Assembling the Application describes how to use command line tools to recompile the sources and rebuild the WAR module and the overall EAR file.
After you've deployed and exercised the HelloWorld EJB sample application and verified that your installation of Apache SOAP works properly with the Apache SOAP samples, you are ready to deploy the HelloWorld SOAP service and client program.
The Ant build facility is used to recompile and assemble the web application and SOAP service. For more information about this build facility and its use with the iPlanet Application Server samples, see the Sample Application Build Facility.
To recompile, reassemble, and redeploy the sample application, follow these steps:
1. Change directories to the SOAP Cart sample application: cd install_dir/ias/ias-samples/soap/helloworld/src. Edit the Ant build file for the sample, build.xml, to ensure the appropriate libraries are used when compiling and deploying the sample. To do this, ensure the following properties are set correctly at the top of the script:
Execute "build" under the install_dir/ias/ias-samples/soap/helloworld/src directoryThe default target, core, will be executed to recompile the Java class files.
3. Deploy and Register the SOAP Service
Execute "build install_service" under the install_dir/ias/ias-samples/soap/helloworld/src/ directory
This target copies the SOAP service class, GreeterService, to the SOAP service directory (we use install_dir/ias/APPS/soap-services/ for convenience). The service is then registered with Apache SOAP using the descriptor file install_dir/ias/ias-samples/soap/helloworld/src/DeploymentDescriptor.xml
Alternatively, you can use the Apache SOAP web-based administrative interface to register the SOAP service. Although the administrative interface registers the SOAP service, you must still ensure that the SOAP service classes are deployed to an accessible location within the application server.
4. Install the Client Application
Execute "build install_client" under the install_dir/ias/ias-samples/soap/helloworld/src/ directory.
This command will copy the GreeterClient class to the directory install_dir/ias/soap-client/.
install_dir/ias/APPS/soap-services/If you did not already add this directory to the server's classpath, then add it now based on the instructions in the Installing Apache SOAP on iPlanet. This addition will ensure that the GreeterService class is accessible to the Apache SOAP infrastructure.
install_dir/ias/APPS/helloworld/helloworldEjb
Now you are ready to exercise the application.
If you ran "build install_client" and have already modified and executed the soap_env script to set SOAP-related environment variables, then you can run the client program in the following manner:
1. Go to your soap-client directory:
install_dir/ias/soap-client/2. Run the client application:
java samples.soap.helloworld.GreeterClient http://127.0.0.1/NASApp/soap/rpcrouter ChrisDepending on the time of day, the output from the client should resemble the following:
Hello World sample with Soap.The client calls the Greeter ejb method through SOAP over HTTP, to get the greeting depending on current time and displays it to client. Behind the scenes:
Good evening Chris. Have a great evening.
If you encounter problems when running the application, review the General Troubleshooting section to learn how to view logs files.
D:\iplanet\ias6\ias\soap-client>java samples.soap.helloworld.GreeterClient http:
//127.0.0.1/NASApp/soap/rpcrouter Chris
Generated fault:
Fault Code = SOAP-ENV:Server
Fault String = Exception from service object: TheGreeter : Invalid guid null in GDS
D:\iplanet\ias6\ias\soap-client>java samples.soap.helloworld.GreeterClient http:
//127.0.0.1/NASApp/soap/rpcrouter Chris
Generated fault:
Fault Code = SOAP-ENV:Server
Fault String = Exception from service object: samples.helloworld.ejb.GreeterHome
You will also find Apache TCP tunnel/monitor tool very useful for debugging SOAP-based applications. The tool is bundled as part of Apache SOAP. To use the tool, run following java program on command line:
java org.apache.soap.util.net.TcpTunnelGui listenport tunnelhost tunnelportThe program opens a port at listenport on local machine which acts as a tunnel to a tunnel (destination) host/port combination specified in command. It displays all request/response messages going back and forth between client and server. For example start the TCP tunnel as follows:
java org.apache.soap.util.net.TcpTunnelGui 9090 localhost 80Now run the client program with the following URL to direct the request to the TCP tunnel:
java samples.soap.helloworld.GreeterClient http://localhost:9090/NASApp/soap/rpcrouter ChrisIn the TCP tunnel window you will see XML messages going back and forth between soap client and soap service.
For more information on TCP tunnel program, refer to Apache SOAP documentation.
With the Apache SOAP web-based Administration Tool, you can use a web browser to deploy/un-deploy services and review the list and the definitions of the services deployed on a given SOAP server. To deploy the HelloWorld SOAP service using the Apache SOAP administration tool, follow these steps:
http://hostname:port/NASApp/soap/admin/index.html
For example, to rebuild the entire application from scratch, follow these steps:
1. Compile and Assemble Web Application
Execute "build" under install_dir/ias/ias-samples/soap/helloworld/src/2. Install the SOAP service and client application:The default target core will be executed to rebuild the SOAP service and client program.
Execute "build install_service" and "build install_client"3. Restart Application Server
An application server restart will be must if you've modified the SOAP service. For SOAP client modification or during the first install of the service to the server, no restart is is necessary.Copyright (c) 2001 Sun Microsystems, Inc. All rights reserved.